At Crisp, we are building a customer service software that provides our users with a chatbox service that they can setup on their website. The Crisp chatbox provides features that require users to stay connected to Crisp servers over WebSocket, via Socket.IO, even if they do not opt to use the chatbox and start a chat.
This design choice in our product makes for a challenging technical task: handing millions of simultaneous WebSocket connections, inside of which real-time events such as messages could be streamed anytime.
As the Crisp user base grows, we get to face more issues related to the scalability of our systems past a certain point. In our initial model, users get load balanced to the server with the least active connections, such that the distribution of connections stays even over all of our WebSocket workers. Unfortunately, this also means that events that must be served to connected clients cannot be routed selectively: they must be broadcasted to all our workers (understand: we do not know which upstream server a chatbox is connected to), which then individually decide which connection to stream events to. In Socket.IO jargon, events get emitted to Socket.IO sockets, which are part of the room that the event targets.
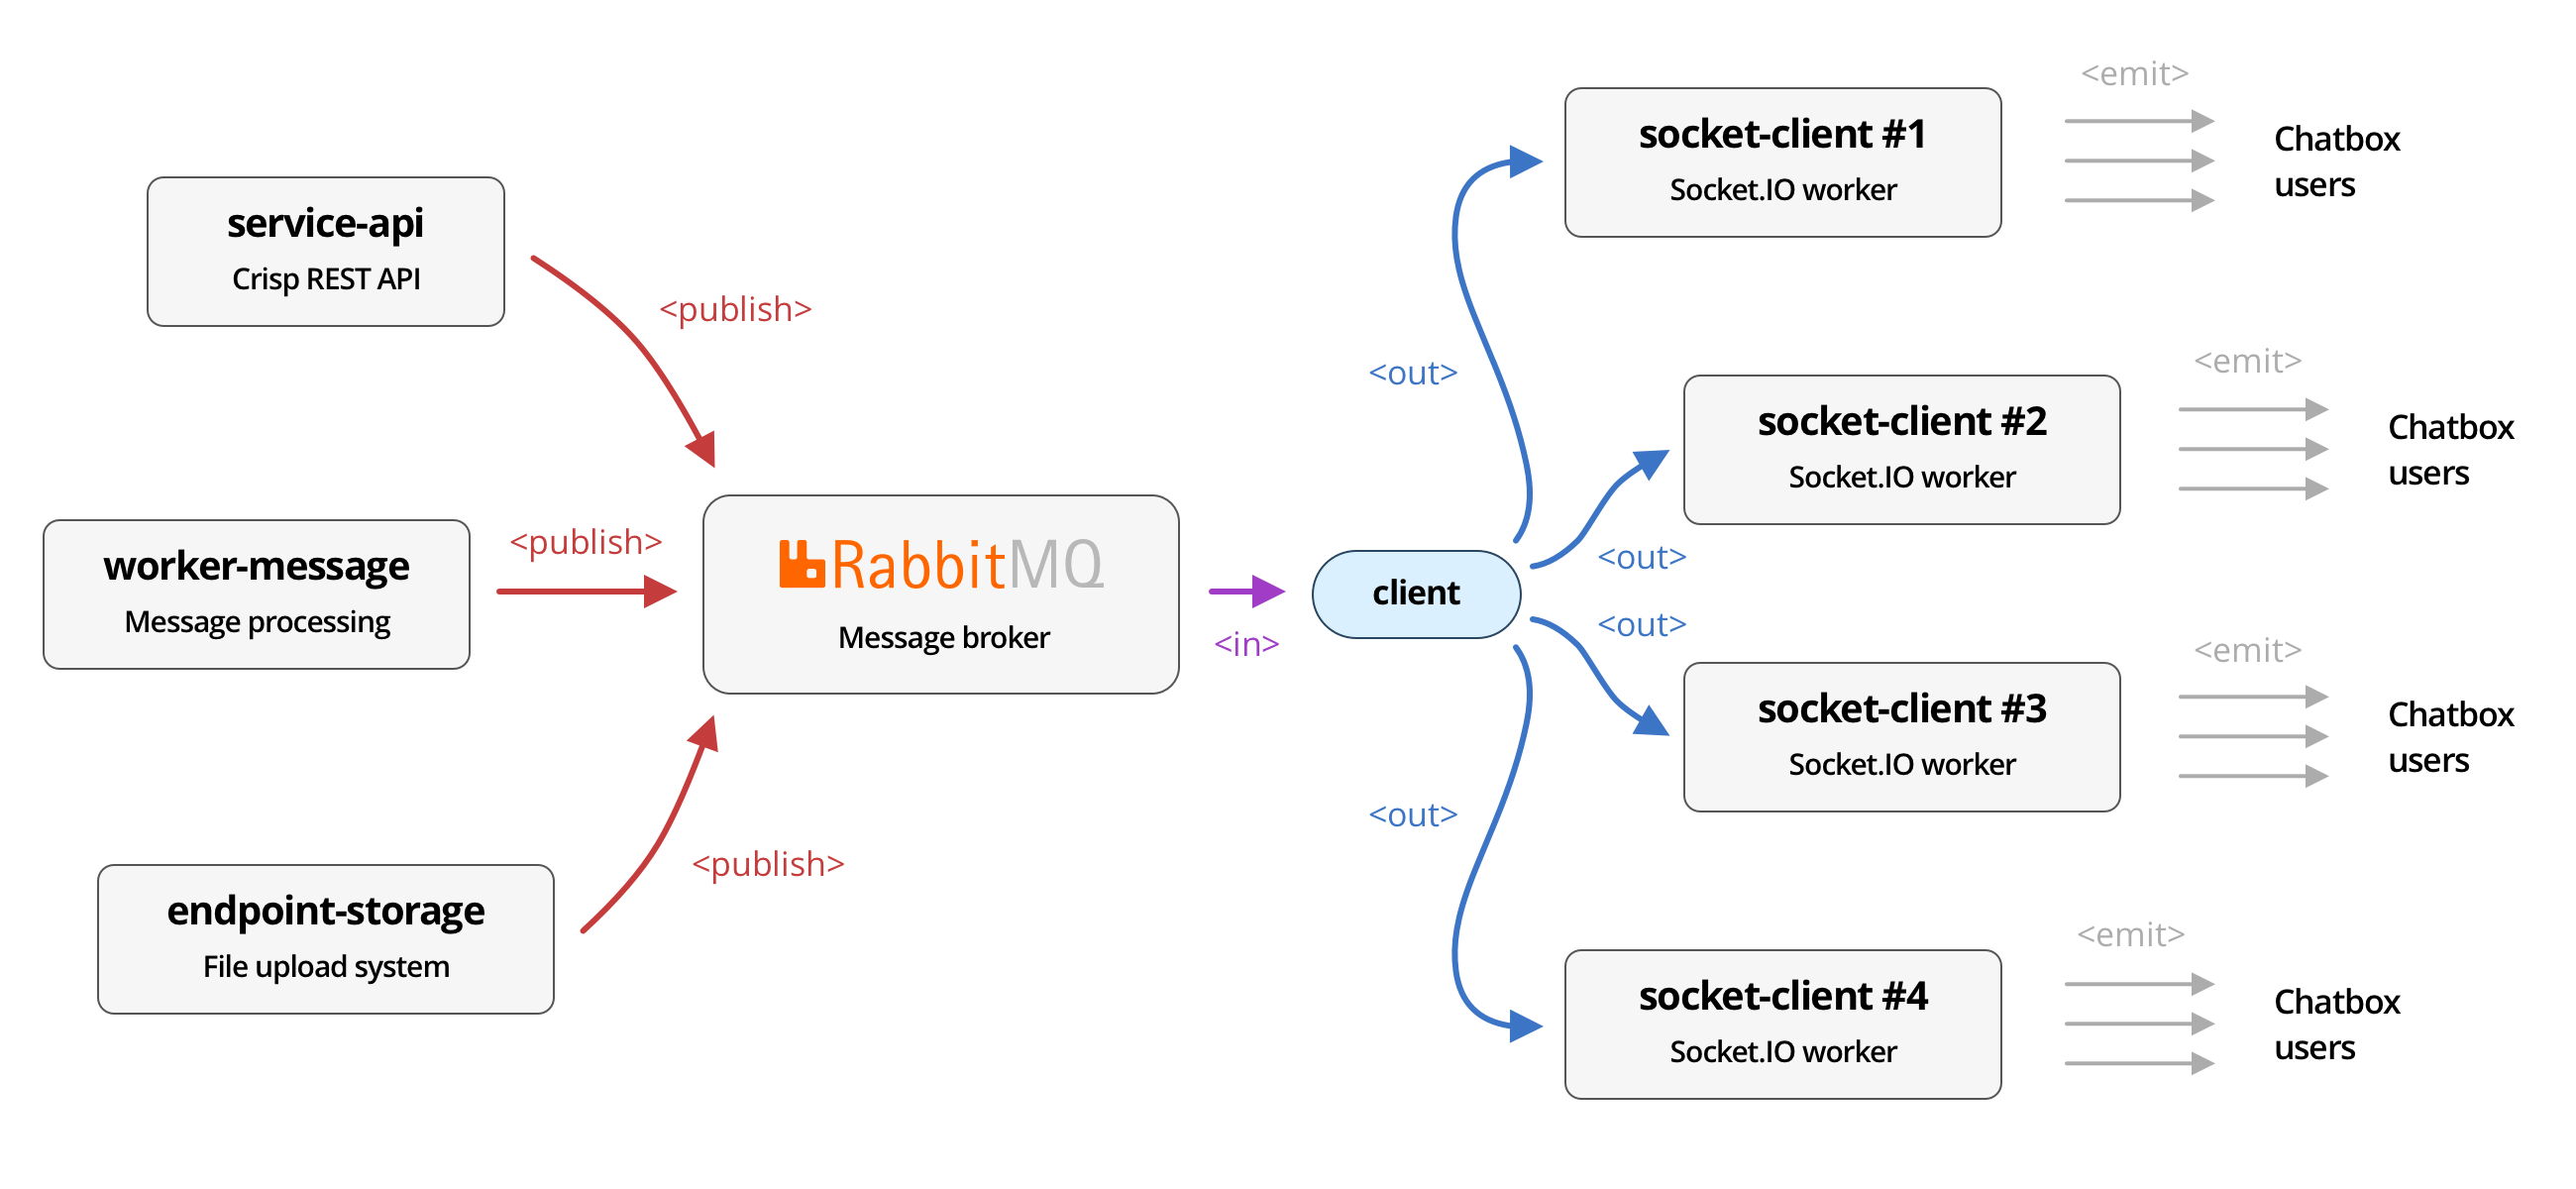
socket-client nodes, which ultimately get emitted to connected chatbox users over WebSocket.This dumb and simple topology has served us well for 6+ years, and proved to be stable and fault-tolerant. However, it comes with a huge tax on resources, not only for Socket.IO servers (which receive all events happening on the platform and need to sort through them), but also for our message broker, RabbitMQ. Our current topology involves RabbitMQ as the AMQP server at the center of our microservices network, passing messages along from exchanges (where they get published), to queues (where they get consumed).
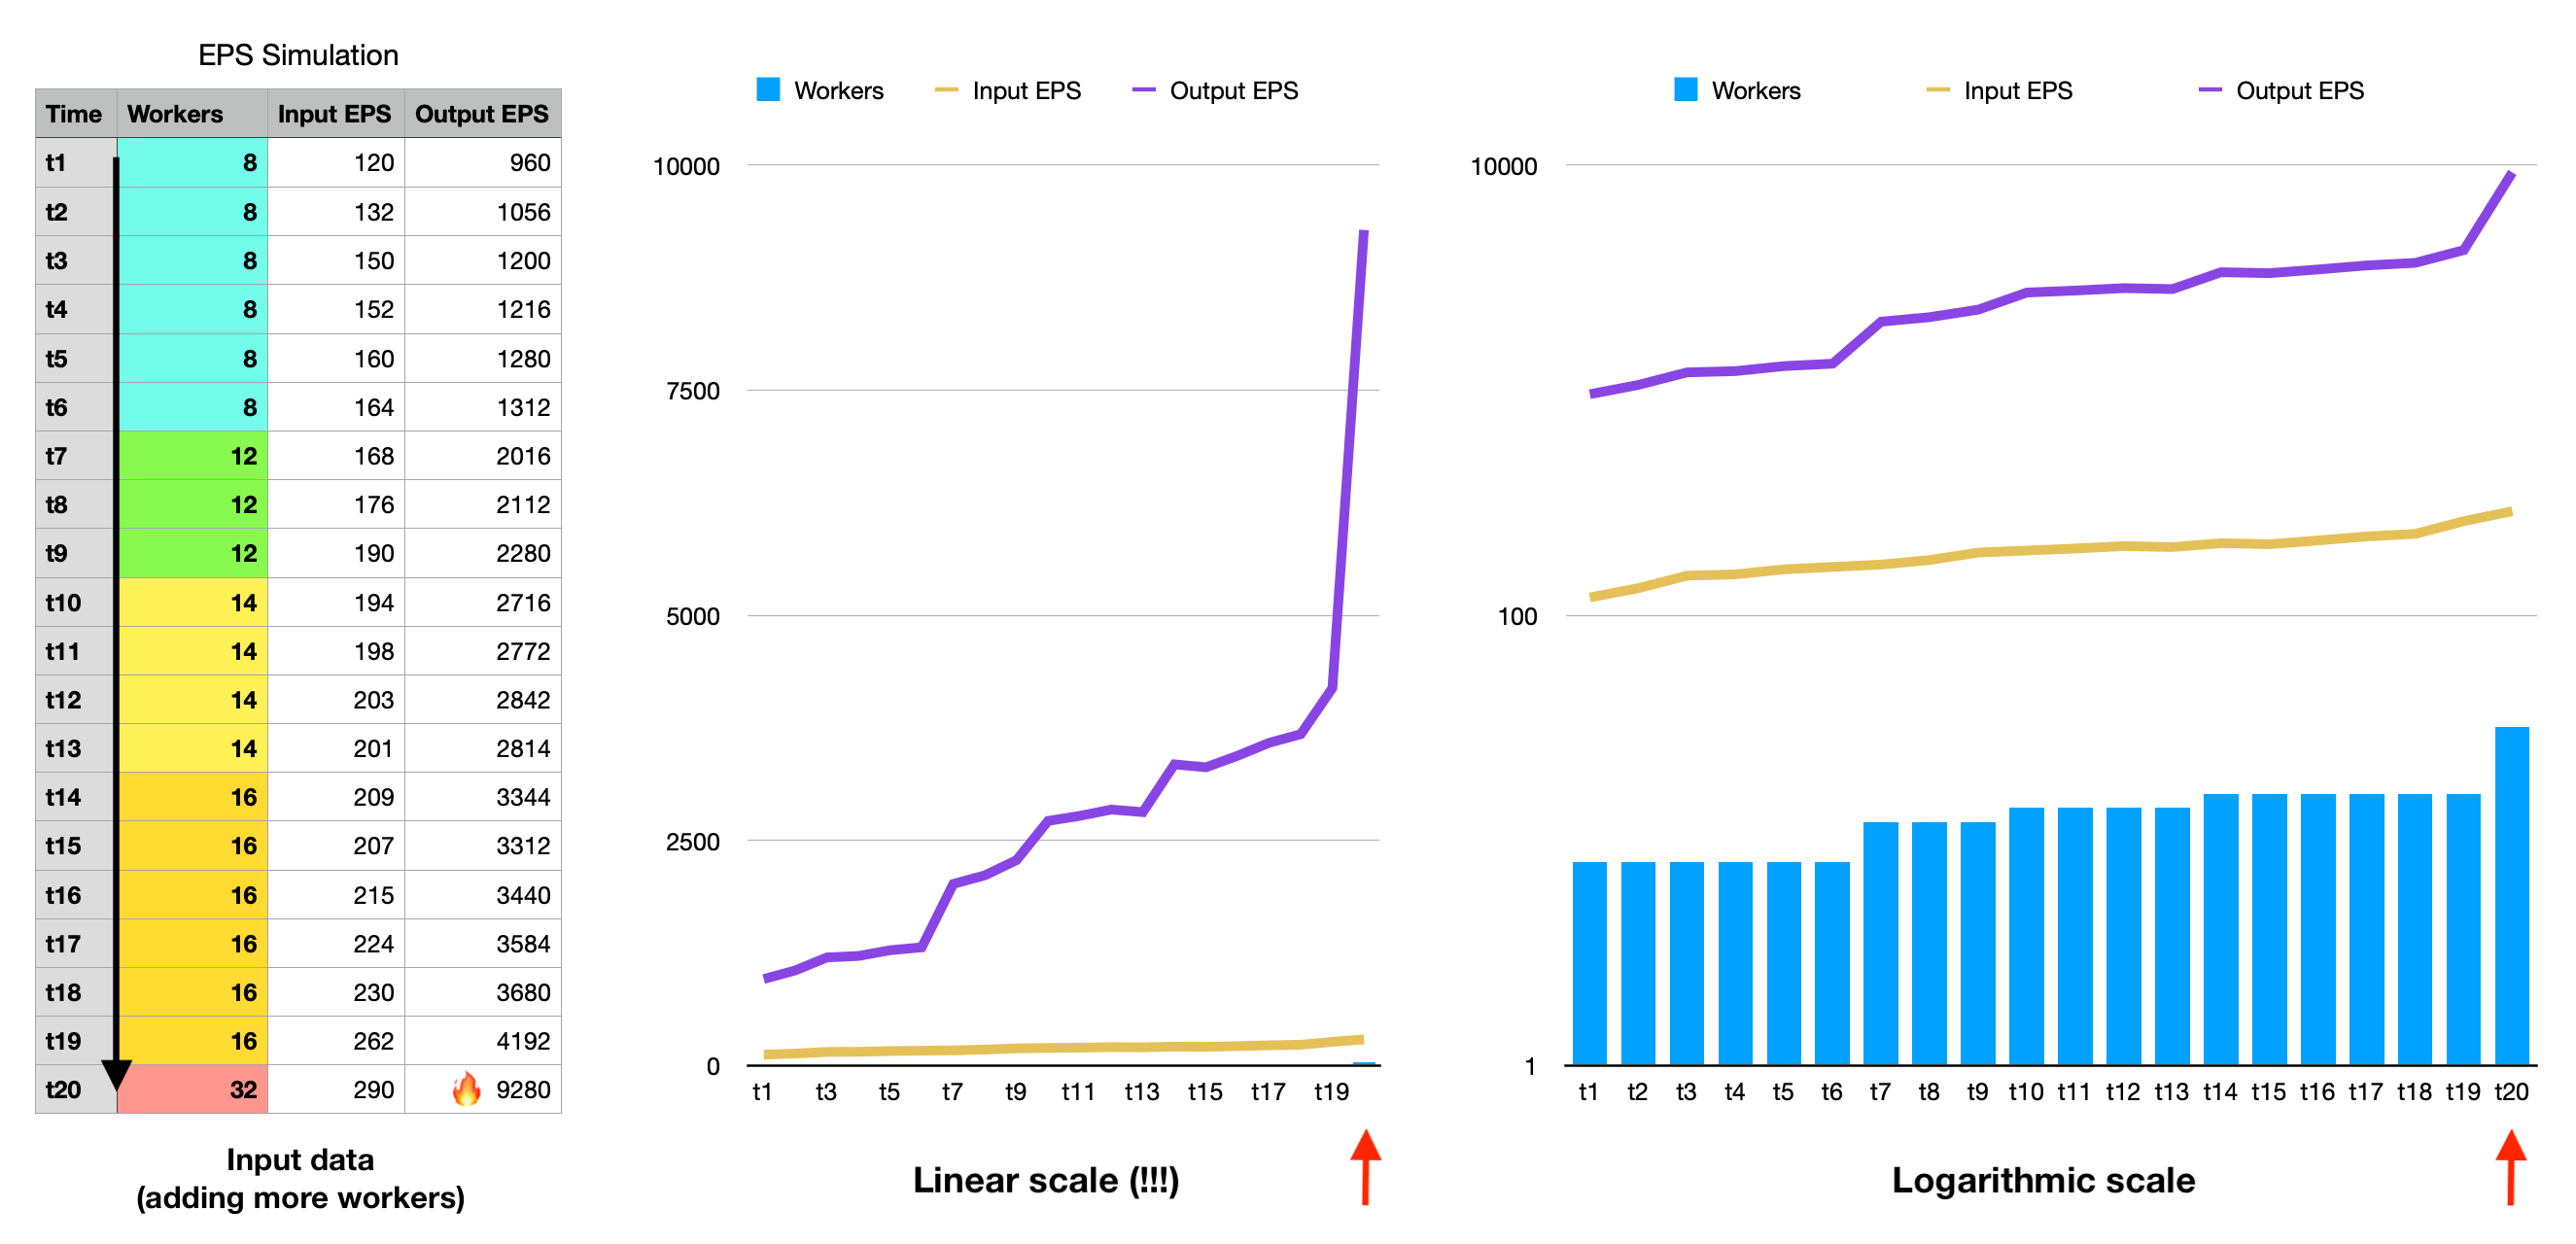
As Socket.IO workers expect to receive a broadcast of all events happening, RabbitMQ has to pick every incoming event on the exchange, and clone them as many times as there are Socket.IO workers to each individual queue. Each queue is bound to a Socket.IO worker, from which the worker consumes incoming events. While this topology works great, it proved to be very costly to RabbitMQ in terms of CPU resources, especially as the number of platform events per second (EPS) grows, and as we add more Socket.IO worker replicas. As of mid-2022, we run 16 WebSocket servers for the chatbox, which means that the events amplification factor is 16. We could roughly say that we are dealing with a complexity of O(W x R), where W is the number of workers, and R is the peak EPS.
Given the inability of our system to scale further, it was just about time for a change. Baptiste and myself pondered on an elegant solution — that I describe in this article — which builds on the top of our existing RabbitMQ-based topology.
Prelude: What are RabbitMQ and Socket.IO?
RabbitMQ is a message broker. It is at the core of microservice infrastructures by acting as the central server to which nodes publish messages. It then serves messages to recipient consumer nodes in the pool, making sure all your nodes receive their fair share of work. RabbitMQ is very powerful, and can be configured to be fault-tolerant and resilient, as part of a cluster. You can define advanced routing policies based on your needs, which is what we will do in this article.
Socket.IO is an abstraction over WebSocket that helps implement bidirectional real-time communication channels in applications. A Socket.IO server handles connections from Socket.IO clients, from which it receives input events, and to which it can also deliver output events. Socket.IO clients are part of rooms, which means that they subscribe to certain events only. Socket.IO servers can be replicated and scaled horizontally, to provide fault-tolerance (ie. if one server fails, your service would still work) and serve more users (ie. by adding more server capacity).
Fast-Forwards: Post-Optimization Savings
I know that most of you would like to see the results of the optimizations we made before diving into the details, so here they are!
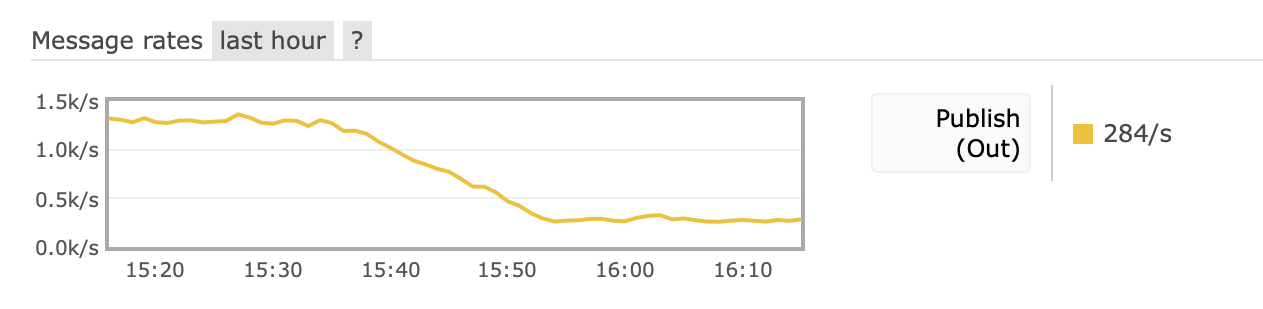
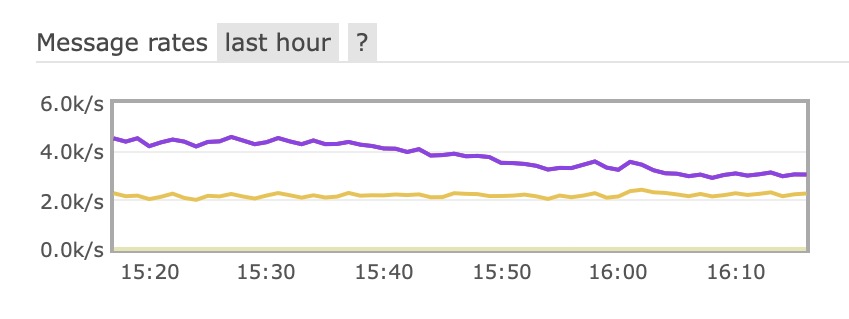
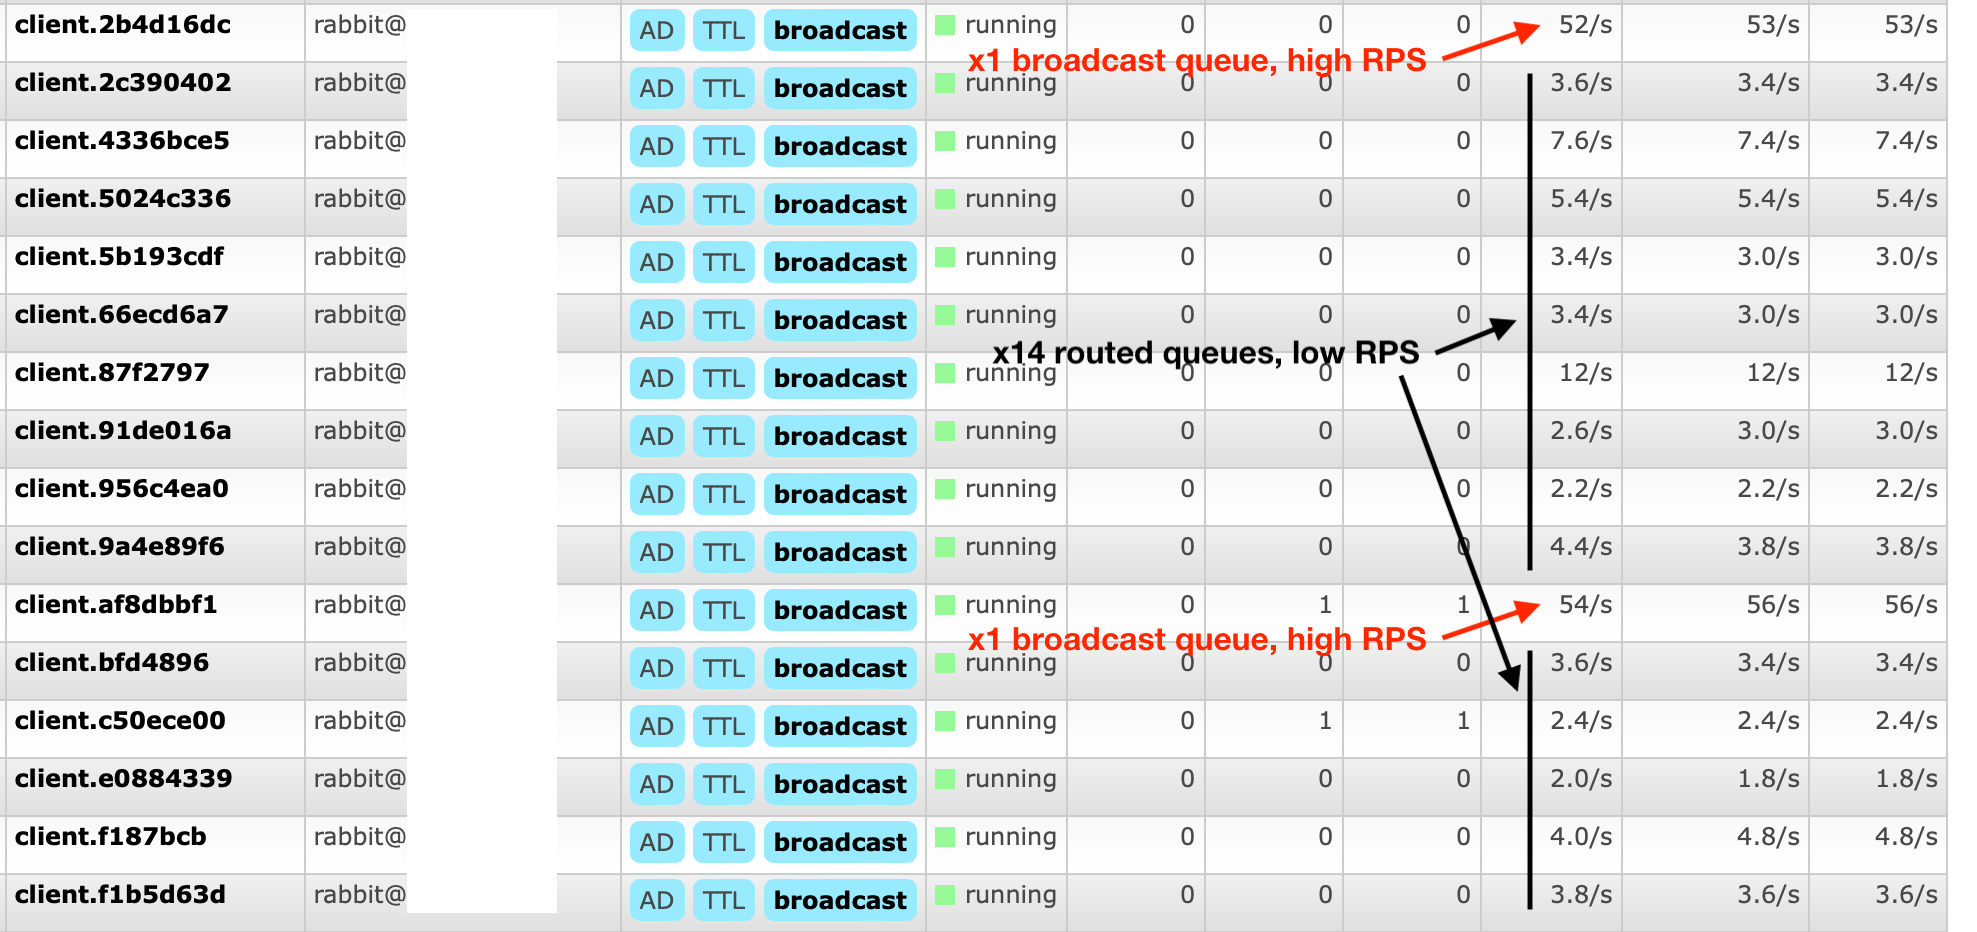
After we completed deploying the optimizations described later in this article, a stark drop in events per seconds was observed on our RabbitMQ cluster. We have reduced approximately by 40% the CPU load induced by RabbitMQ on the host server, and divided by ~8 the total outgoing EPS on the client chatbox exchange.

On the Socket.IO servers end, the CPU usage has been completely slashed. This can be explained by the fact that each worker receives much less payloads per second from RabbitMQ (in our case, this hovers from 8 to 16 times less!), as the load is now distributed on 16 Socket.IO servers from the pool, thanks to the efficient routing of payloads. Note that there might still be some double routing due to failover overlaps — more on that later in the article. The CPU cost of running each Socket.IO server has been divided by two, as workers do not need to parse every incoming event anymore to take the routing decision.
RabbitMQ Routing Keys to the Rescue
⚠️ Not so fast… Production crashes ensued!
In our previous topology, other nodes in our infrastructure would publish events that should be routed to Socket.IO clients via an exchange named client (for the chatbox). This exchange is bound to multiple queues (one individual queue for each Socket.IO worker). The queue auto-destroys itself whenever its consumer (the Socket.IO worker) comes offline, which means that they are configured as non-durable, auto-delete queues. We have also made sure to setup an HA Policy (for High-Availability Policy) of exactly 1 mirror. This means that the queue will not get mirrored over multiple RabbitMQ cluster nodes, as we do not care about data loss since real-time events that get streamed over Socket.IO are transient — this configuration greatly helps reduce induced RabbitMQ CPU usage.
Whenever publishing an event to a target chatbox (designated by its Crisp session identifier, which is set per-user), the publisher node in our infrastructure would publish the payload on RabbitMQ to the client exchange, with an empty routing key. Since all Socket.IO queues are bound to the client exchange with an empty routing key, the published event would get pushed to each individual queue.
Enforcing routing keys usage
Our initial topology, that uses empty routing keys, made the upgrade extremely easy: we would only need to consider that whenever a user connects to their session identifier over the Crisp chatbox Socket.IO server, the server would bind its queue to the client exchange, with a routing key for the session, eg. session_3de9c68f (read this tutorial from the RabbitMQ website for more on routing keys). Whenever the Socket.IO room for the session is left, the server would unbind session_3de9c68f from the exchange, and voilà!
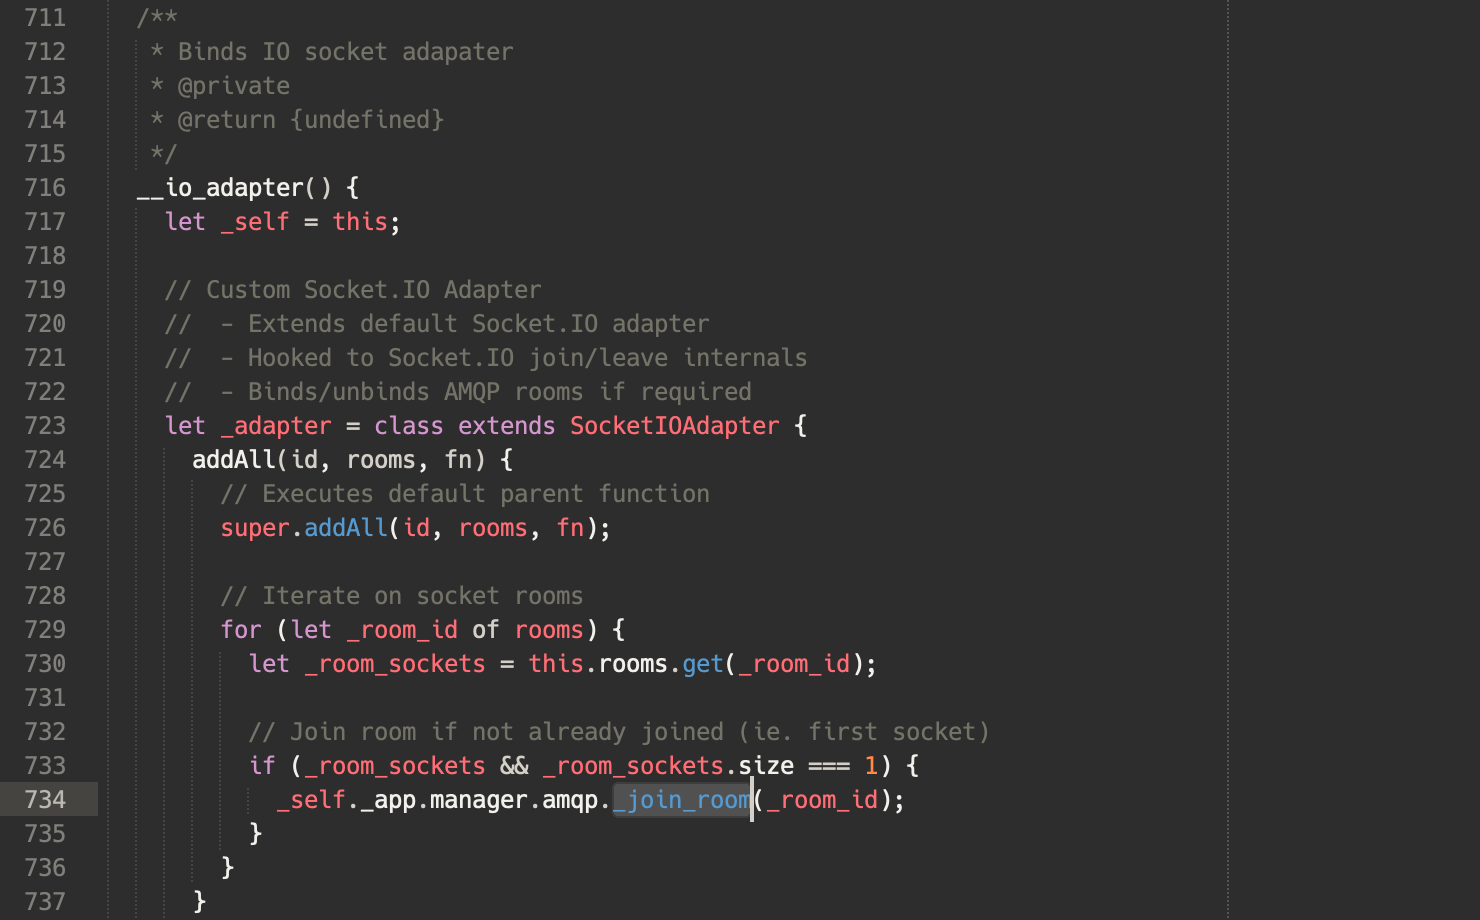
addAll() method. This is fired every time a user joins a room. Note that we could as well listen on the create-room event from the Socket.IO server.
On their end, event publishers would attach a routing key to each payload sent to the client exchange (here: session_3de9c68f), so that RabbitMQ would only forward the event to the queue bound with the same routing key (here: session_3de9c68f).

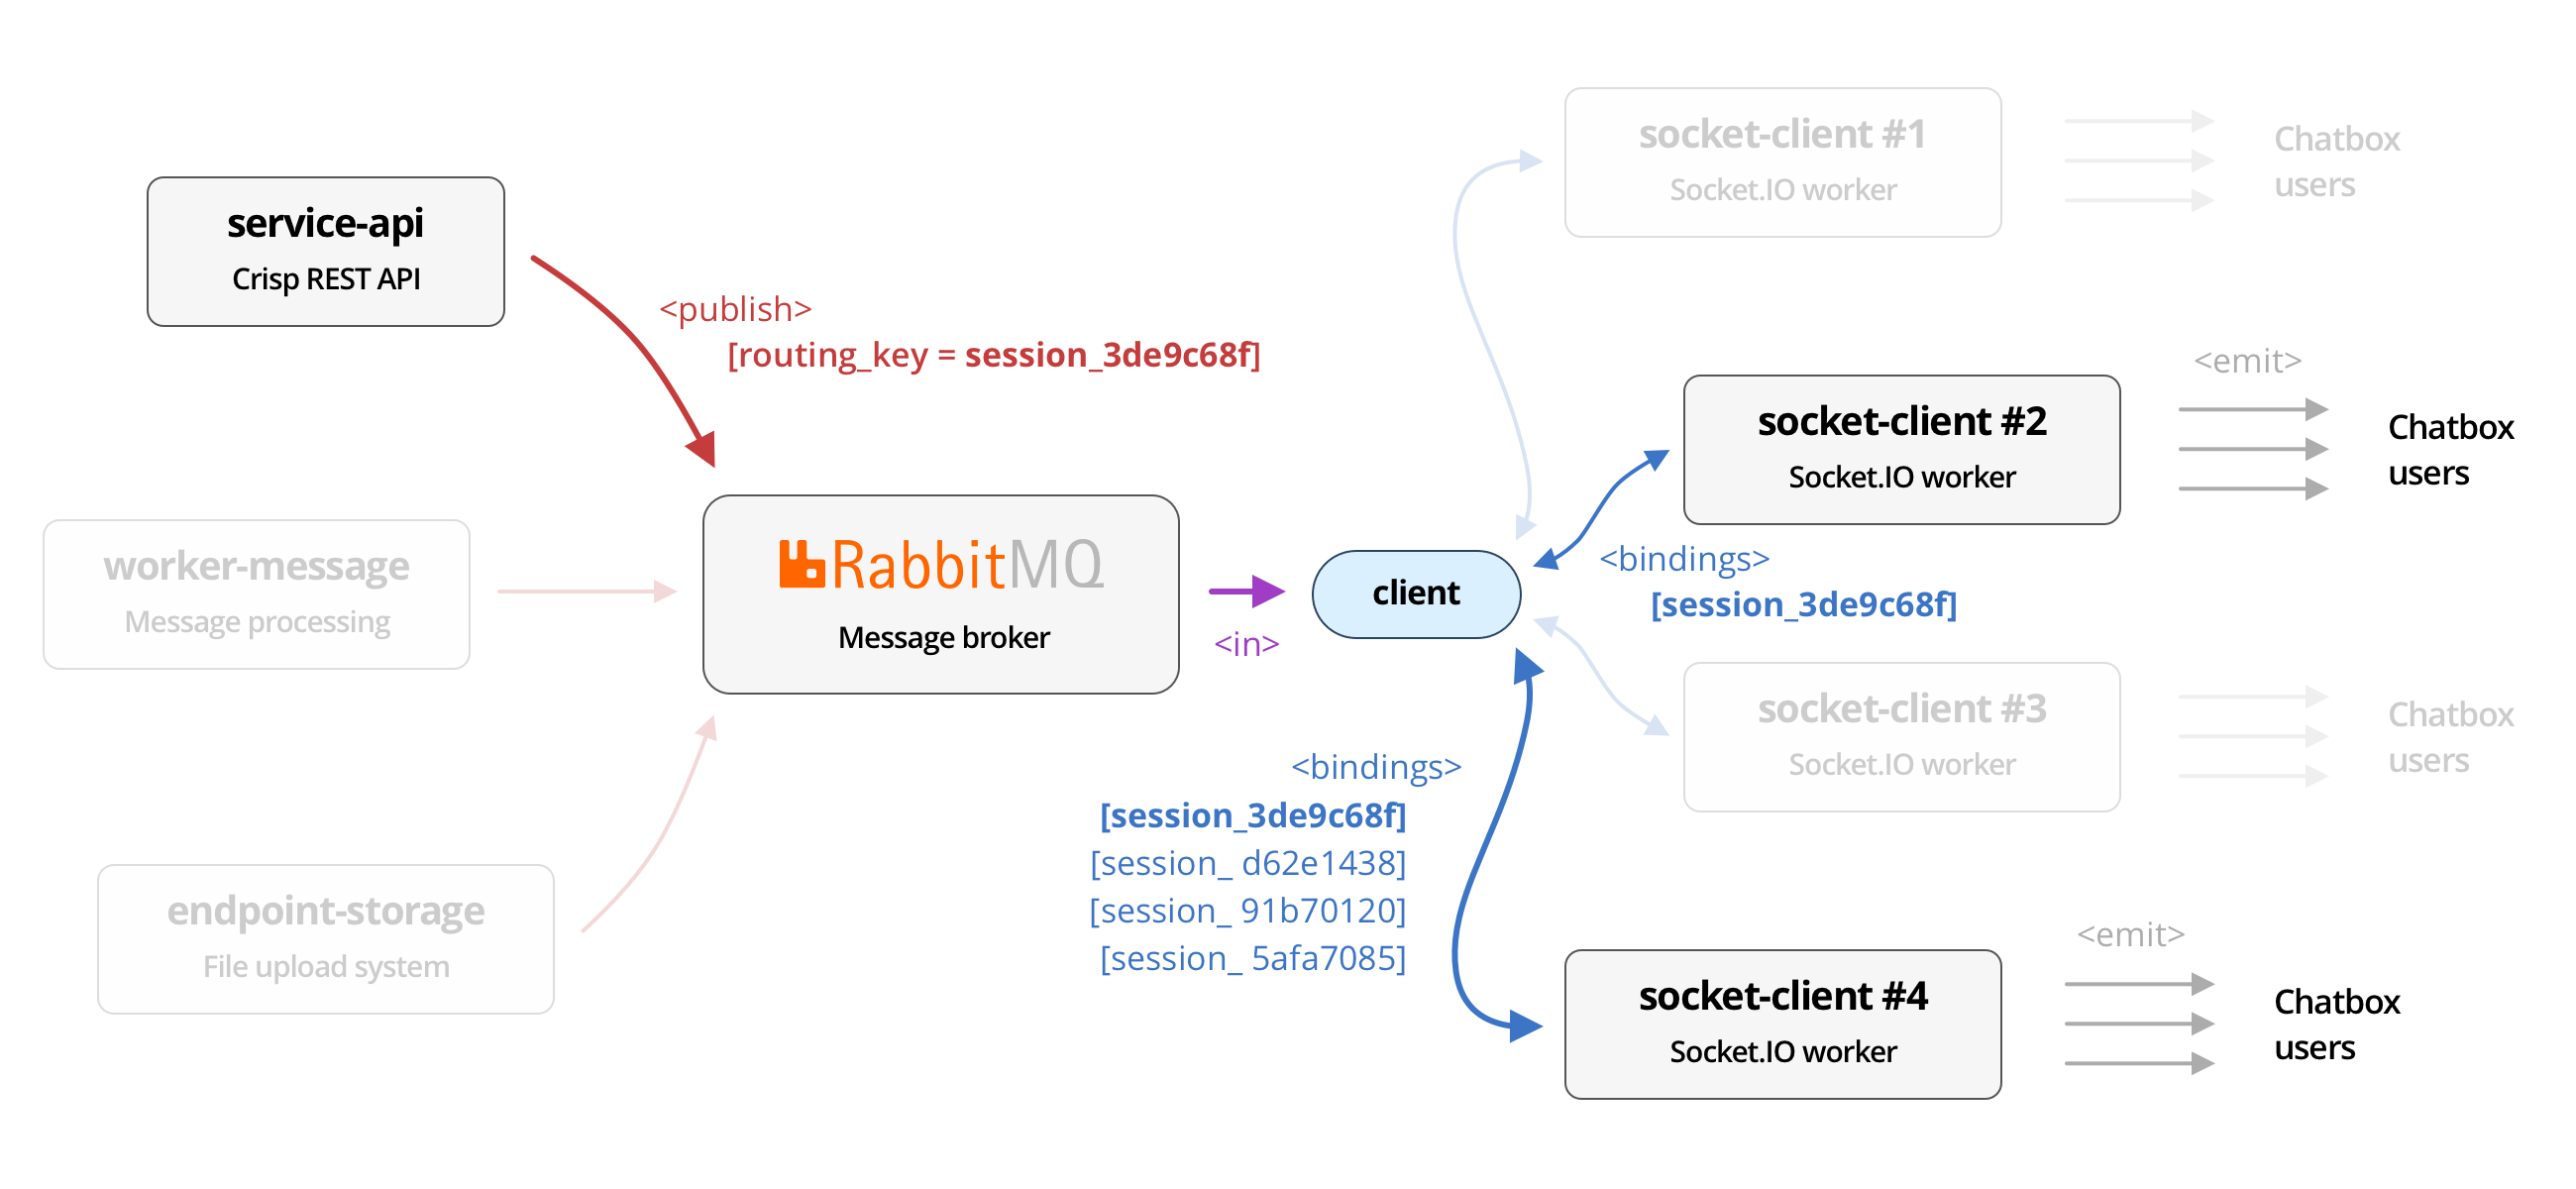
socket-client nodes which are bound to the same routing key. If no node is bound to the message routing key, then the message is dropped, as it routes nowhere.This elegant method required minimal change to our topology, and was built on the top of the AMQP protocol, which had been designed for that. There was, however, a hitch…
Total production collapse ensued
Not all things in this world go as planned every time.
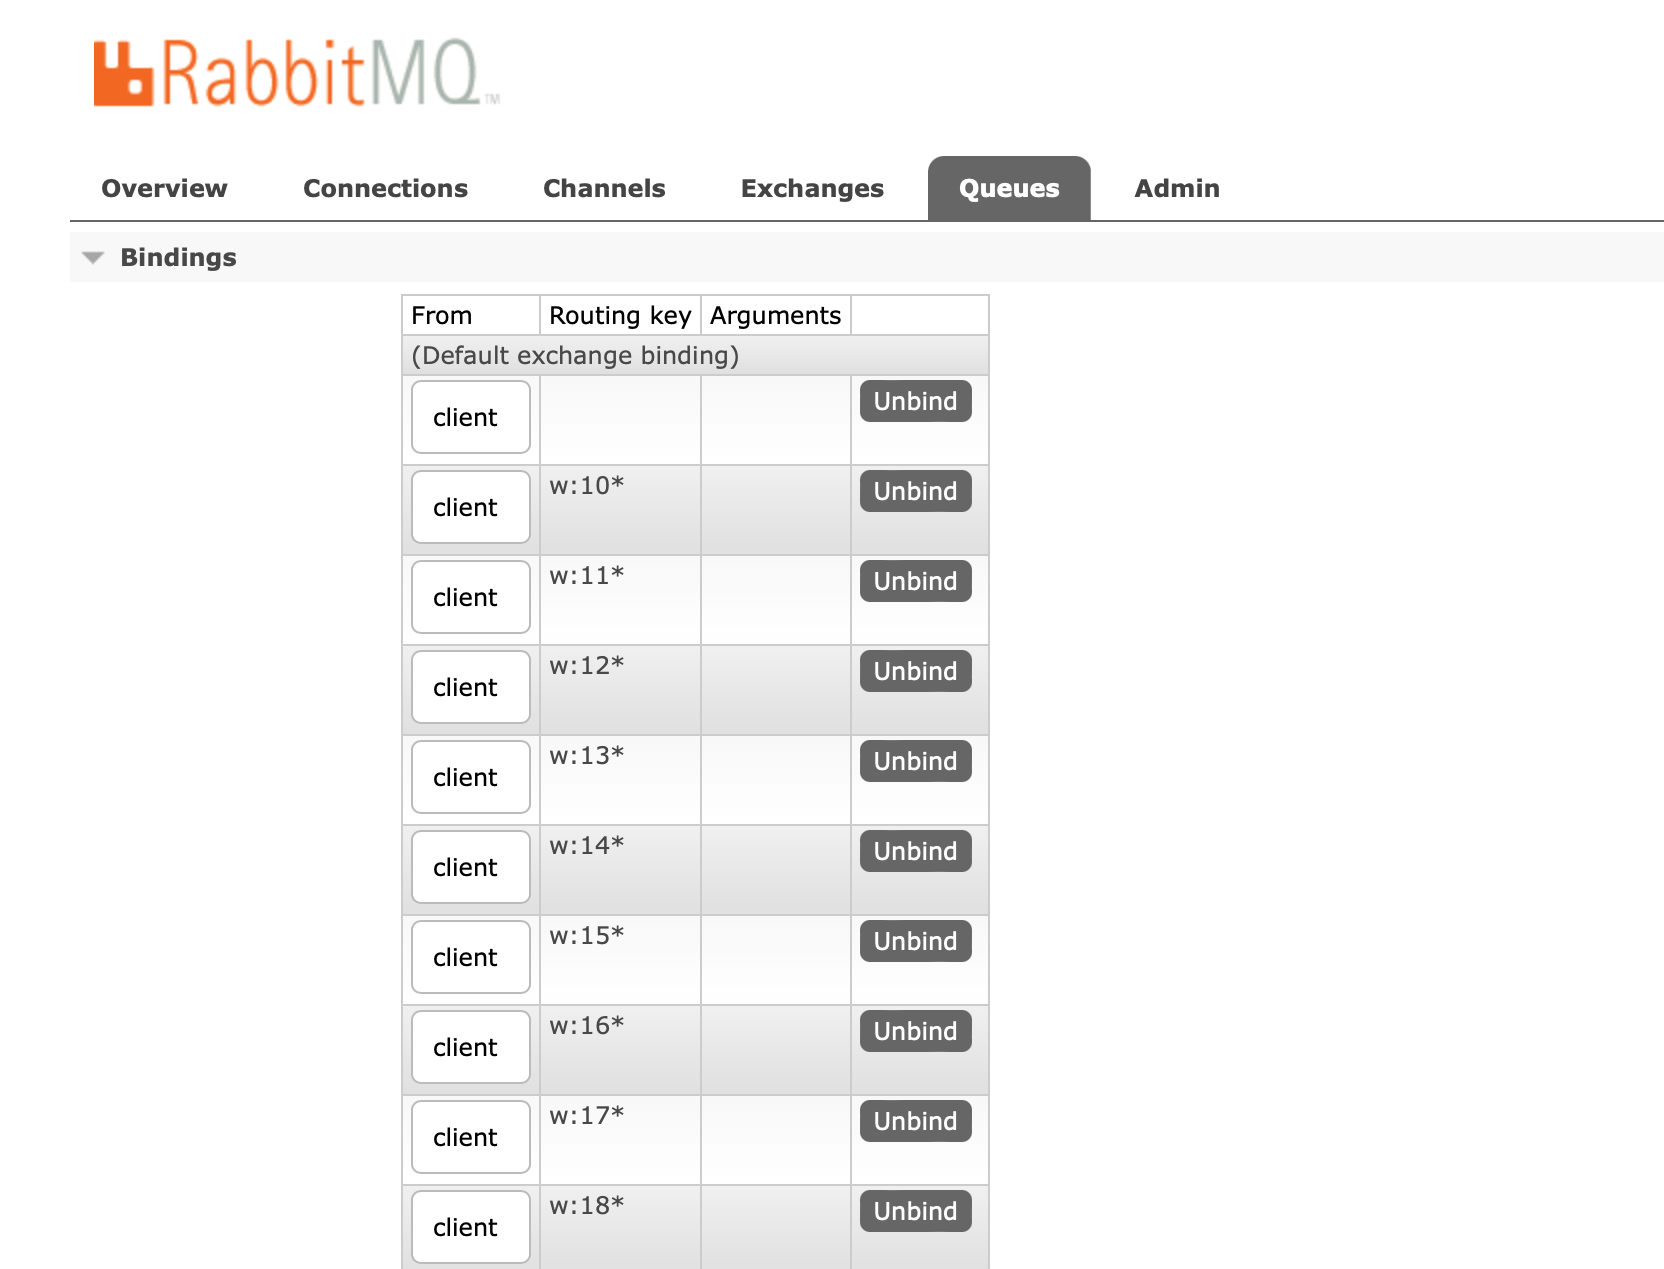
In production, we expected to bind A LOT of Socket.IO rooms to RabbitMQ queues, via routing keys. When I say a lot, I mean 50k+ bindings per queue.
Knowing this constraint, we made hardcore simulations in our development environment, reproducing 10k+ bindings, with a high bind/unbind rate (that is, adding new routing keys to the exchange-queue association, and removing them very fast). RabbitMQ behaved very well on our MacBooks, so we were very confident that it would work nicely in production. Plus, routing is RabbitMQ’s job after all, even if it lacks documentation and benchmarks on the matter.
It was about time to deploy, so we pushed the new routing system to production. It seemed to be a success: routing behaved perfectly as planned and RabbitMQ bindings were populated with thousands of routing keys, with no hitch.
We however, started to notice that RabbitMQ memory usage was growing to ~80% of its high watermark limit, then the GC would pass and sweep that memory back to ~20%. This memory allocation pattern would repeat itself on and on every ~10 minutes or so, but the overall cluster was stable, therefore this did not raise any concern on our end.
A few hours after the deployment, we decided to restart a Socket.IO worker node (1 out of the 16) as part of an unrelated server maintenance. This server was shutdown in a rather routine way. We quickly found out however that something was going wrong on our infrastructure as a whole: Crisp messages were not going through anymore, user availabilities were not being processed anymore, etc. We connected to the RabbitMQ Web Management dashboard, to discover with horror that it was unavailable, throwing HTTP 500 errors. All AMQP queues were stuck, and did not accept any publish order anymore.
Following the meltdown of our entire RabbitMQ cluster, we connected over SSH to the servers hosting RabbitMQ instances, to find out that all CPUs were going through the roof and memory was swapping like crazy. We came to conclude that tearing down a queue with a lot of routing keys (40k+ in this case) was something RabbitMQ could not handle, at least in production. It was time to cycle the cluster and bring it back up.
Later that day, we upscaled the VMs hosting our RabbitMQ cluster to increase their CPU and RAM capacity 4x, and enlarge RabbitMQ memory high watermark limit to 6GB of RAM, and tried again running our new routing system. To no luck, the same cluster meltdown was observed following a single Socket.IO worker shutdown. Only this time, our server had plenty of CPU and RAM capacity left, but all RabbitMQ nodes still froze upon stopping a Socket.IO worker!
After a quick rollback to the previous non-routed topology, we came to the conclusion that binding that many routing keys was just not going to work, but another way could be possible.
After delving in a blog article, we learnt that RabbitMQ behaved very differently when running as part of a cluster (as in production) from running as a single instance (as in development). It is especially inefficient and slow at synchronizing the exchange-queue routing table across all other RabbitMQ instances in the cluster, which (might?) involve distributed locks and latency.
Finding the Best Balance with Prefix Routing
Based on our production meltdown observations described above, we came to the conclusion that we had to reduce the cardinality of routing keys on exchange-queue bindings (meaning, limiting the number of possible routing keys to a predictable number). Not only that, but we also had to minimize the churn rate on routing key bindings (that is, the rate at which routing keys get bound and unbound), in order to minimize overhead on routing table synchronization across the RabbitMQ cluster.
Moving to prefix routing keys
The trick in our new solution, is that we should hash the original identifier to be used as a routing key (eg. session or website identifier, where an UUID such as website_ff6b409b-ef69-4ddb-9cf1-ff80e302361a would become 30ea6586fe179c00 with the Farmhash hashing function), and then prepend its type (eg. website would be w:, so here we obtain: w:30ea6586fe179c00).
Hashing the raw identifier provides the guarantee it is encoded in a compact hexadecimal form, for which each character has only 16 different possible values (base 16 encoding). The type we just prepended helps debug which kind of routing key it is, either website (w:), session (s:), or something else. We could have chosen to skip this part though, as the prefix is not required per se.
Once our full routing key is generated, such as: w:30ea6586fe179c00, we truncate it to the number of hash characters we want our route prefix to be limited to. The less characters the prefix holds, the smaller the cardinality is, and therefore the less bindings will be declared in our RabbitMQ client exchange (which is a desirable property). We opted for 2 characters.
Crisp chatbox sessions are bound to two Socket.IO rooms: a session identifier and a website identifier. A website on Crisp corresponds to a messaging inbox, where messages get sent. A website holds many sessions. For load-balancing stickiness reasons that I’ll come over on later, in the part on NGINX, we could not use sessions as our routing keys, therefore we opted for websites.
All that said above, in our Crisp client routing keys use case, for the full routing key: w:30ea6586fe179c00, we would obtain the prefix routing key: w:30.
Let’s now check how many different routing keys could be bound to our exchange (the cardinality) in a worst-case scenario. Knowing that hexadecimal-encoded characters can hold 16 different values, we obtain: Card(s) = 16^s, where s is the truncation size and Card(s) the worst-case cardinality given s. Our truncation size is 2, therefore we obtain: Card(2) = 16 x 16 = 256. It looks like RabbitMQ could happily handle this number of bindings! What about a truncation size of 3? That would give us Card(3) = 4096, which could start slowing down our RabbitMQ cluster based on our earlier observations in production, so let’s stick on a truncation size of 2.
Deciding when to bind/unbind the routing key on the AMQP queue
Your AMQP client code will need to decide when to bind a given routing key prefix to the exchange, for its queue. As well, it should decide when to unbind the routing key when it is not needed anymore, because there are no users connected to the associated Socket.IO room anymore.
We recommend that you opt for a dynamic routing topology, where you would hook onto your Socket.IO server events, through the create-room and delete-room events (see documentation here), and automatically bind or unbind the RabbitMQ queue to its exchange, for the routing key corresponding to the Socket.IO room.
It means that when the first users joins a room for a website prefix, then your Socket.IO worker declares to RabbitMQ that it would like to receive incoming events for that prefix. Subsequent users to join the same room will not result in further AMQP bindings. When users leave, it will wait for the last user to leave the room to unbind itself from that routing prefix on RabbitMQ.
Given what we described above about the cost of updating the AMQP routing table across a RabbitMQ cluster (binding and unbinding), and the behavior of certain bogous clients that tend to to open WebSocket connections, close them, open them again, etc., we advise that you introduce a delay in committing the unbind request to RabbitMQ (could be 20s). You would cancel this delay if a client was to connect to the same room before the delay fires. This technique also helps ease with massive reconnections (and massive churn rates on bindings) that follow a restart of your NGINX load balancers.
We can now enforce routing again in our production infrastructure! But wait… aren’t so few routing keys possibilities (here, 256) equivalent to our previous system (no routing keys at all) when the number of connected users is high? You are just right! Users will get evenly load-balanced to all of our 16 Socket.IO workers, regardless of the resulting routing prefix. It means that each worker queue will be bound to ~256 RabbitMQ routing keys on the exchange, as the number of WebSocket connections tends to infinity.
Obviously, we do not want that. It means that our solution to the routing problem is incomplete there. We lack the NGINX part, described right below.
NGINX affinity routing to the rescue
While we have put routing into place on our AMQP pipeline, we still need to make sure that the 256 possible routing prefixes are evenly distributed over our 16 Socket.IO workers. Best-case, it means that each worker would be bound to around 16 routing prefixes, effectively receiving 1/16 of total events (ie. [256 routing prefixes] divided by [16 total Socket.IO workers] = 16 prefixes per worker).

2^32 possible slots, which is simplified to 256 slots here for legibility. Each slot in the ring maps to an upstream.We use NGINX as the load balancer for all our incoming WebSocket connections. When a user connects the Crisp chatbox, a WebSocket connection to wss://client.relay.crisp.chat/ is opened.
The second trick, here, is to provide the website identifier in its truncated hash form (therefore, as a prefix), in the connection URL. We would now want to connect to eg. wss://client.relay.crisp.chat/w/30/. Since the chatbox knows its website identifier before opening the WebSocket connection, but does not necessarily know its session identifier, we opted to route based on the website identifier.
Now that the routing prefix is given in the URL, NGINX can use this value to route the connection to a preferred Socket.IO worker. More specifically, this Socket.IO worker will be responsible for all /w/30/ connections, and therefore it will be the only one binding itself to the w:30 AMQP routing key.
We have essentially created an affinity routing system. We let the client decide of the selected Socket.IO worker upstream by including the routing key in the URL, which should in 99.99% cases map to the same AMQP routing key. This effectively groups Crisp chatboxes with the same routing key on the same Socket.IO worker upstream.
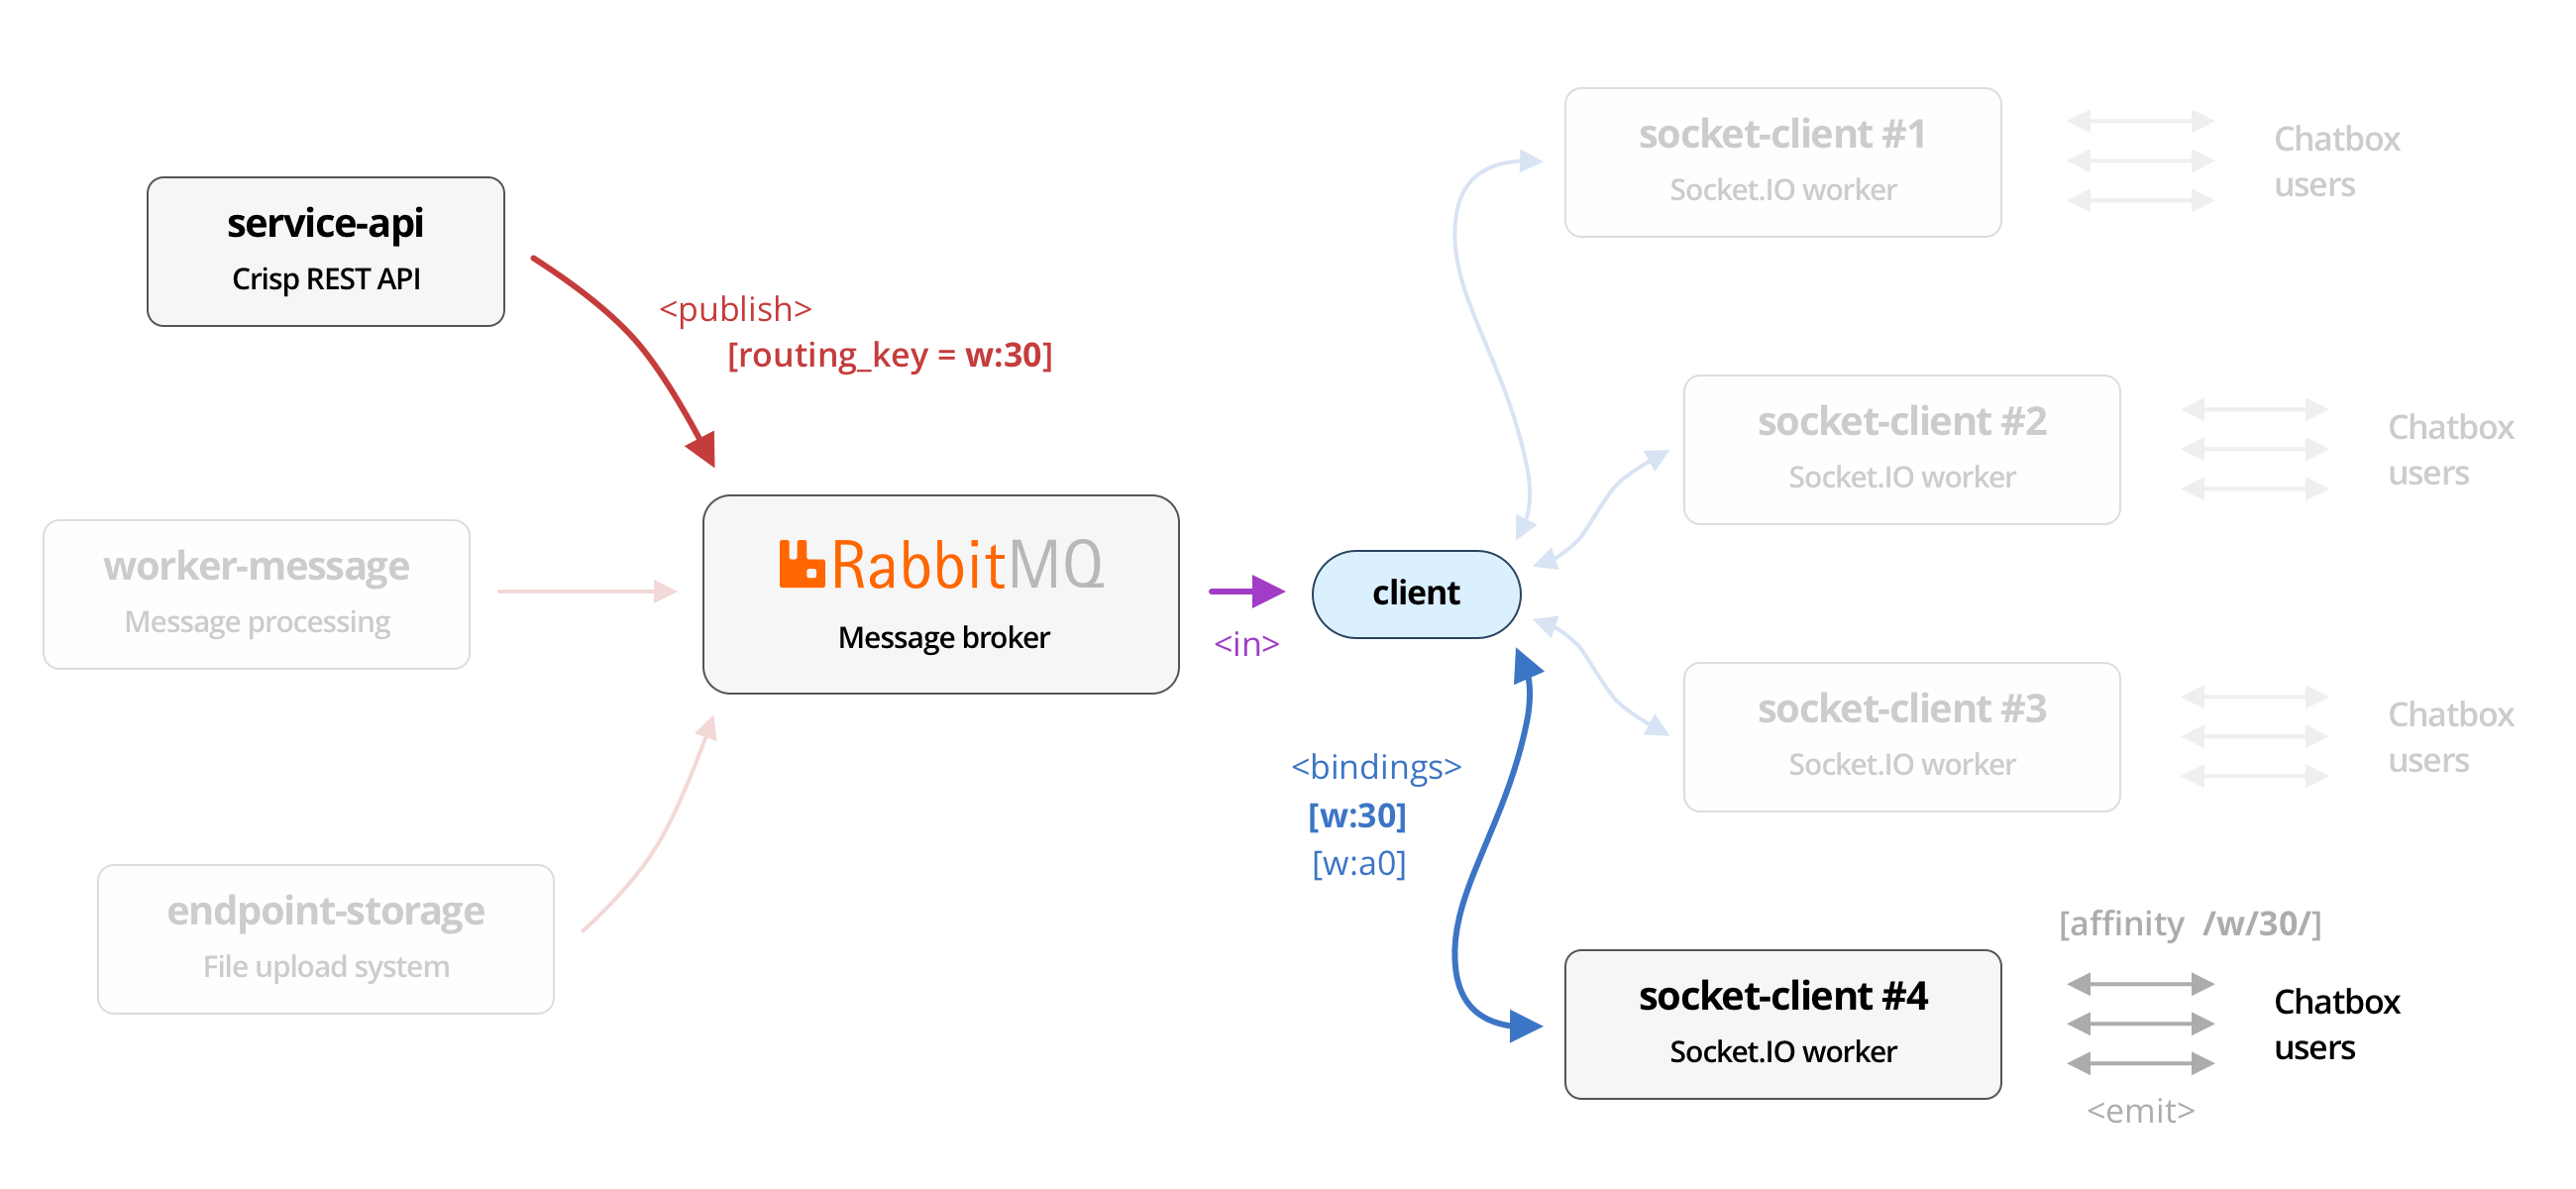
socket-client node responsible for the routing prefix set in the message routing key. Connected clients are routed to the correct socket-client node thanks to the affinity key passed in the WebSocket URL.How did we adjust our NGINX configuration files to enable affinity routing? Fairly easy; we split our upstreams into: default and affinity pools:
- The
defaultpool is used for legacy clients (those not passing the prefix route in the URL); - The
affinitypool is used for newer clients (those passing the prefix route in the URL).
The default pool would obviously be the slowest one, bound to more AMQP routing prefixes as no affinity hints are provided by the older clients, and therefore exhibiting a much higher CPU usage. Based on your use-case, you could also choose to completely deprecate support for older clients and omit the default pool. The default pool uses the traditional round-robin balancing method, which would distribute connections evenly across the pool.
The affinity upstreams would use the consistent hash balancing method, based on the routing prefix extracted from the request URL (as a variable). This guarantees that for a given routing prefix, the same upstream will get selected again and again. As we add more upstreams in the future, this also ensures that most connections would still be routed to the same upstream as before (giving it a nice stickiness property).
1. Split your NGINX upstreams into default and affinity:
# Default upstream
upstream default.chatbox-socket.local {
    server worker-1.legacy.chatbox-socket.local:3000  max_fails=0;
    server worker-2.legacy.chatbox-socket.local:3000  max_fails=0;
}

# Affinity upstream (website)
upstream website.chatbox-socket.local {
    hash $affinity_key consistent;

    server worker-1.chatbox-socket.local:3000  max_fails=0;
    server worker-2.chatbox-socket.local:3000  max_fails=0;
    server worker-3.chatbox-socket.local:3000  max_fails=0;
    server worker-4.chatbox-socket.local:3000  max_fails=0;

    # — (10 values eluded for readability) —

    server worker-15.chatbox-socket.local:3000  max_fails=0;
    server worker-16.chatbox-socket.local:3000  max_fails=0;
}
2. Split your NGINX location block into default and affinity:
# Default pool (round-robin routing)
location / {
    proxy_pass http://default.chatbox-socket.local;

    add_header 'X-Crisp-Ray' 'default $upstream_addr' always;

    # — (add your proxy rules here) —
}

# Website pool (affinity hash-based routing)
location ~ "^/(w)/([^/]+)" {
    # Extract routing prefix from the URL (gives eg. 'w:00')
    set $affinity_key $1:$2;

    proxy_pass http://website.chatbox-socket.local;

    add_header 'X-Crisp-Ray' 'website $affinity_key $upstream_addr' always;

    # — (add your proxy rules here) —

    break;
}
Restart your NGINX load balancers, and try connecting to the / path, and eg. the /w/00/ path over WebSocket. The X-Crisp-Ray should indicate that the default and website pool are respectively being used, and also output the address of the upstream that was picked up.
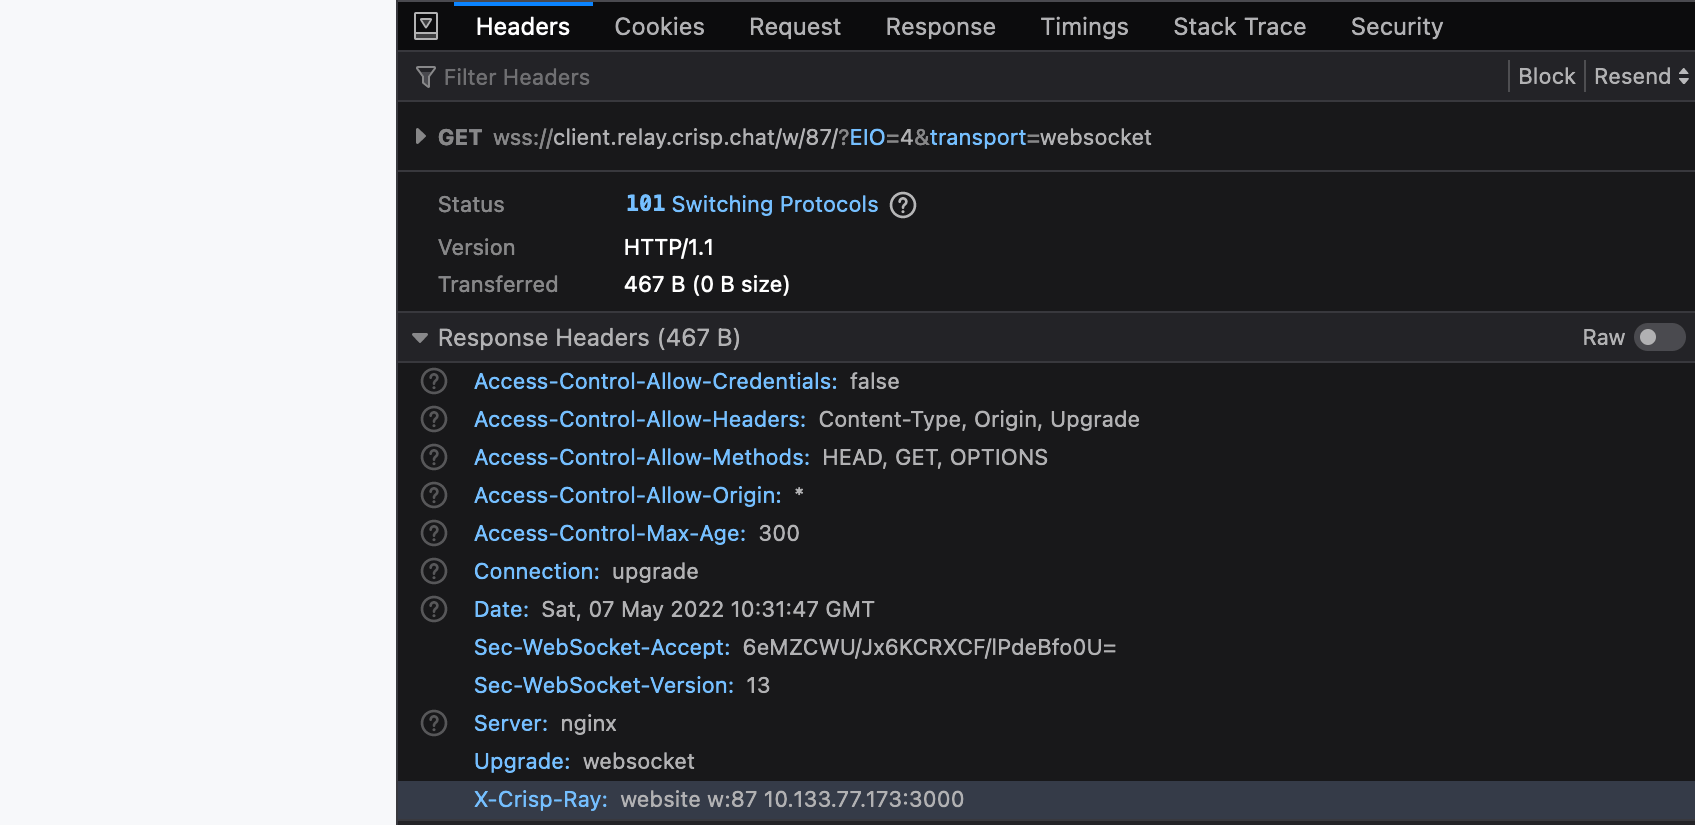
w:87 — shows that the same upstream is used, which is responsible for handling AMQP events with routing key w:87 (see the X-Crisp-Ray header).Maintaining redundancy and failover capabilities
Now that we have affinity sat up, you would want to ask: what happens if the Socket.IO worker responsible for my Crisp website identifier is down? Would my chatbox service be 100% unavailable for the duration of the outage? Well, yes, since that’s how affinity works: it maps a route prefix to a specific worker in the pool. Unless… we allow NGINX to pick the next available Socket.IO worker upstream in the affinity ring.
All that we had to do to ensure that NGINX would re-route connections to the next Socket.IO worker in the ring, is to add the following rules in our NGINX location group:
proxy_next_upstream error;
proxy_next_upstream_tries 2;
Those proxy rules are described in details in the NGINX documentation.
This limits the next upstream tries to 2 attempts in total, so if the second upstream is down as well, the WebSocket connection would generate an HTTP 502 error. The total number of attempts should be limited, as you’d want to fail early in a situation where a large part of your fleet of Socket.IO workers is down, in order to avoid overloading the healthy side of your fleet with a ton of connections.
In our case, if a second upstream connection attempt was made, a trace would be left in the X-Crisp-Ray HTTP header, which would hold the comma-separated values of the 2 attempted upstreams (in order).
Closing Notes
The optimization techniques that I described in this article should not be considered too early in a distributed Socket.IO environment that uses RabbitMQ to route events between nodes.
As the saying goes:
Premature optimization is the root of all evil.
Looking back to our early days at Crisp, it would have been overkill to add this kind of complexity to our infrastructure topology earlier than today. However, with the growth of our user base came scaling issues with our initial (simple) broadcast routing system, that made changes necessary to support our growth in the future.
I know this article was highly technical, and that very few projects run an architecture similar to ours. If you’re interested in distributed microservice architectures, we might have an engineering position open at Crisp for you!
I would be happy helping you! If you are running into the same problems as we did, and you still have questions, please leave a comment below. If you are just curious and would like to learn more about the microservice architecture that powers Crisp at scale, please also let me know in the comments section.
👉 Note that this article has been re-published on Crisp blog; the original version lives here, on my personal journal.
🇵🇹 Written from Lisbon, Portugal.