After spending countless hours trying to understand how to deploy my apps on Kubernetes for the first time to host Mirage, an AI API service that I run, I ended up making myself a promise that the next app I work on would be using a more productive & simpler orchestration platform. This is where I stumbled upon Nomad from HashiCorp.
Nomad runs your apps from definitions files, as code. It’s essentially a small binary that you install on your servers, plus a single configuration file. Nomad embraces the same minimalistic approach to software of UNIX. This makes it incredibly easy for an operator to deploy and manage a Nomad cluster. This is the complete opposite of Kubernetes, where the same task is so complicated that users often resort to using managed Kubernetes clusters.
This article explains how to deploy a Nomad cluster on cheap Vultr servers, step-by-step, using a minimal Alpine Linux distribution. The Nomad cluster will be made of 3 Nomad servers and as many Nomad clients as you’d like. We will be automating the process of adding more Nomad clients as you grow. Note that Nomad servers are the Nomad agents responsible for receiving jobs (ie. apps you wish to deploy), and managing their allocation on Nomad clients. Nomad clients are the Nomad agents which actually run your apps. While a Nomad agent can be both a server and a client, it’s usually a good practice to separate them.
Once our Nomad cluster is running, we will then proceed to host a Vigil instance, which is an open-source project of mine that can be used to monitor microservices.
1. Setup Vultr Account for Nomad
Vultr is a cloud provider which offers cheap $5/month VPS servers, as well as a wide range of useful cloud services such as virtual private LAN networks (VPCs), cloud firewall, and more. You might already know about DigitalOcean — Vultr is quite similar in features and server speed. Vultr runs a datacenter on every continent on the planet, so that you can create a server nearby from wherever you live: US, Mexico, Chile, France, Japan, India, Australia, South Africa, and 24 other locations.
👉 If you don’t have an account with Vultr, I’d suggest you create one using this link, which gives you $100 of free credits, enough to run a single server for more than a year at no cost.
Once your Vultr account is created, and before we can create our first server, we’ll start with setting up:
- Our VPC: the private local network which will allow our servers to talk to each other privately;
- Our Firewall secures our server by restricting who can access what from the open Internet;
- A Boot Script: installs all required dependencies to run Nomad when the servers you create boot for the first time, and also auto-configures your Nomad cluster;
Let’s start!
1.1. Create a VPC network
Nomad agents within our cluster need a secure private network link over which to communicate. We will create a VPC network, which is essentially a private LAN between our Vultr servers. Servers connected to the VPC will expose a secondary network interface named eth1. Nomad will bind itself to the VPC interface.
In the Vultr dashboard top bar, hover the blue Deploy button, then click “Create VPC 2.0”. Then, pick your target datacenter region, in which you will also create your actual servers. In my case, I went with Paris.
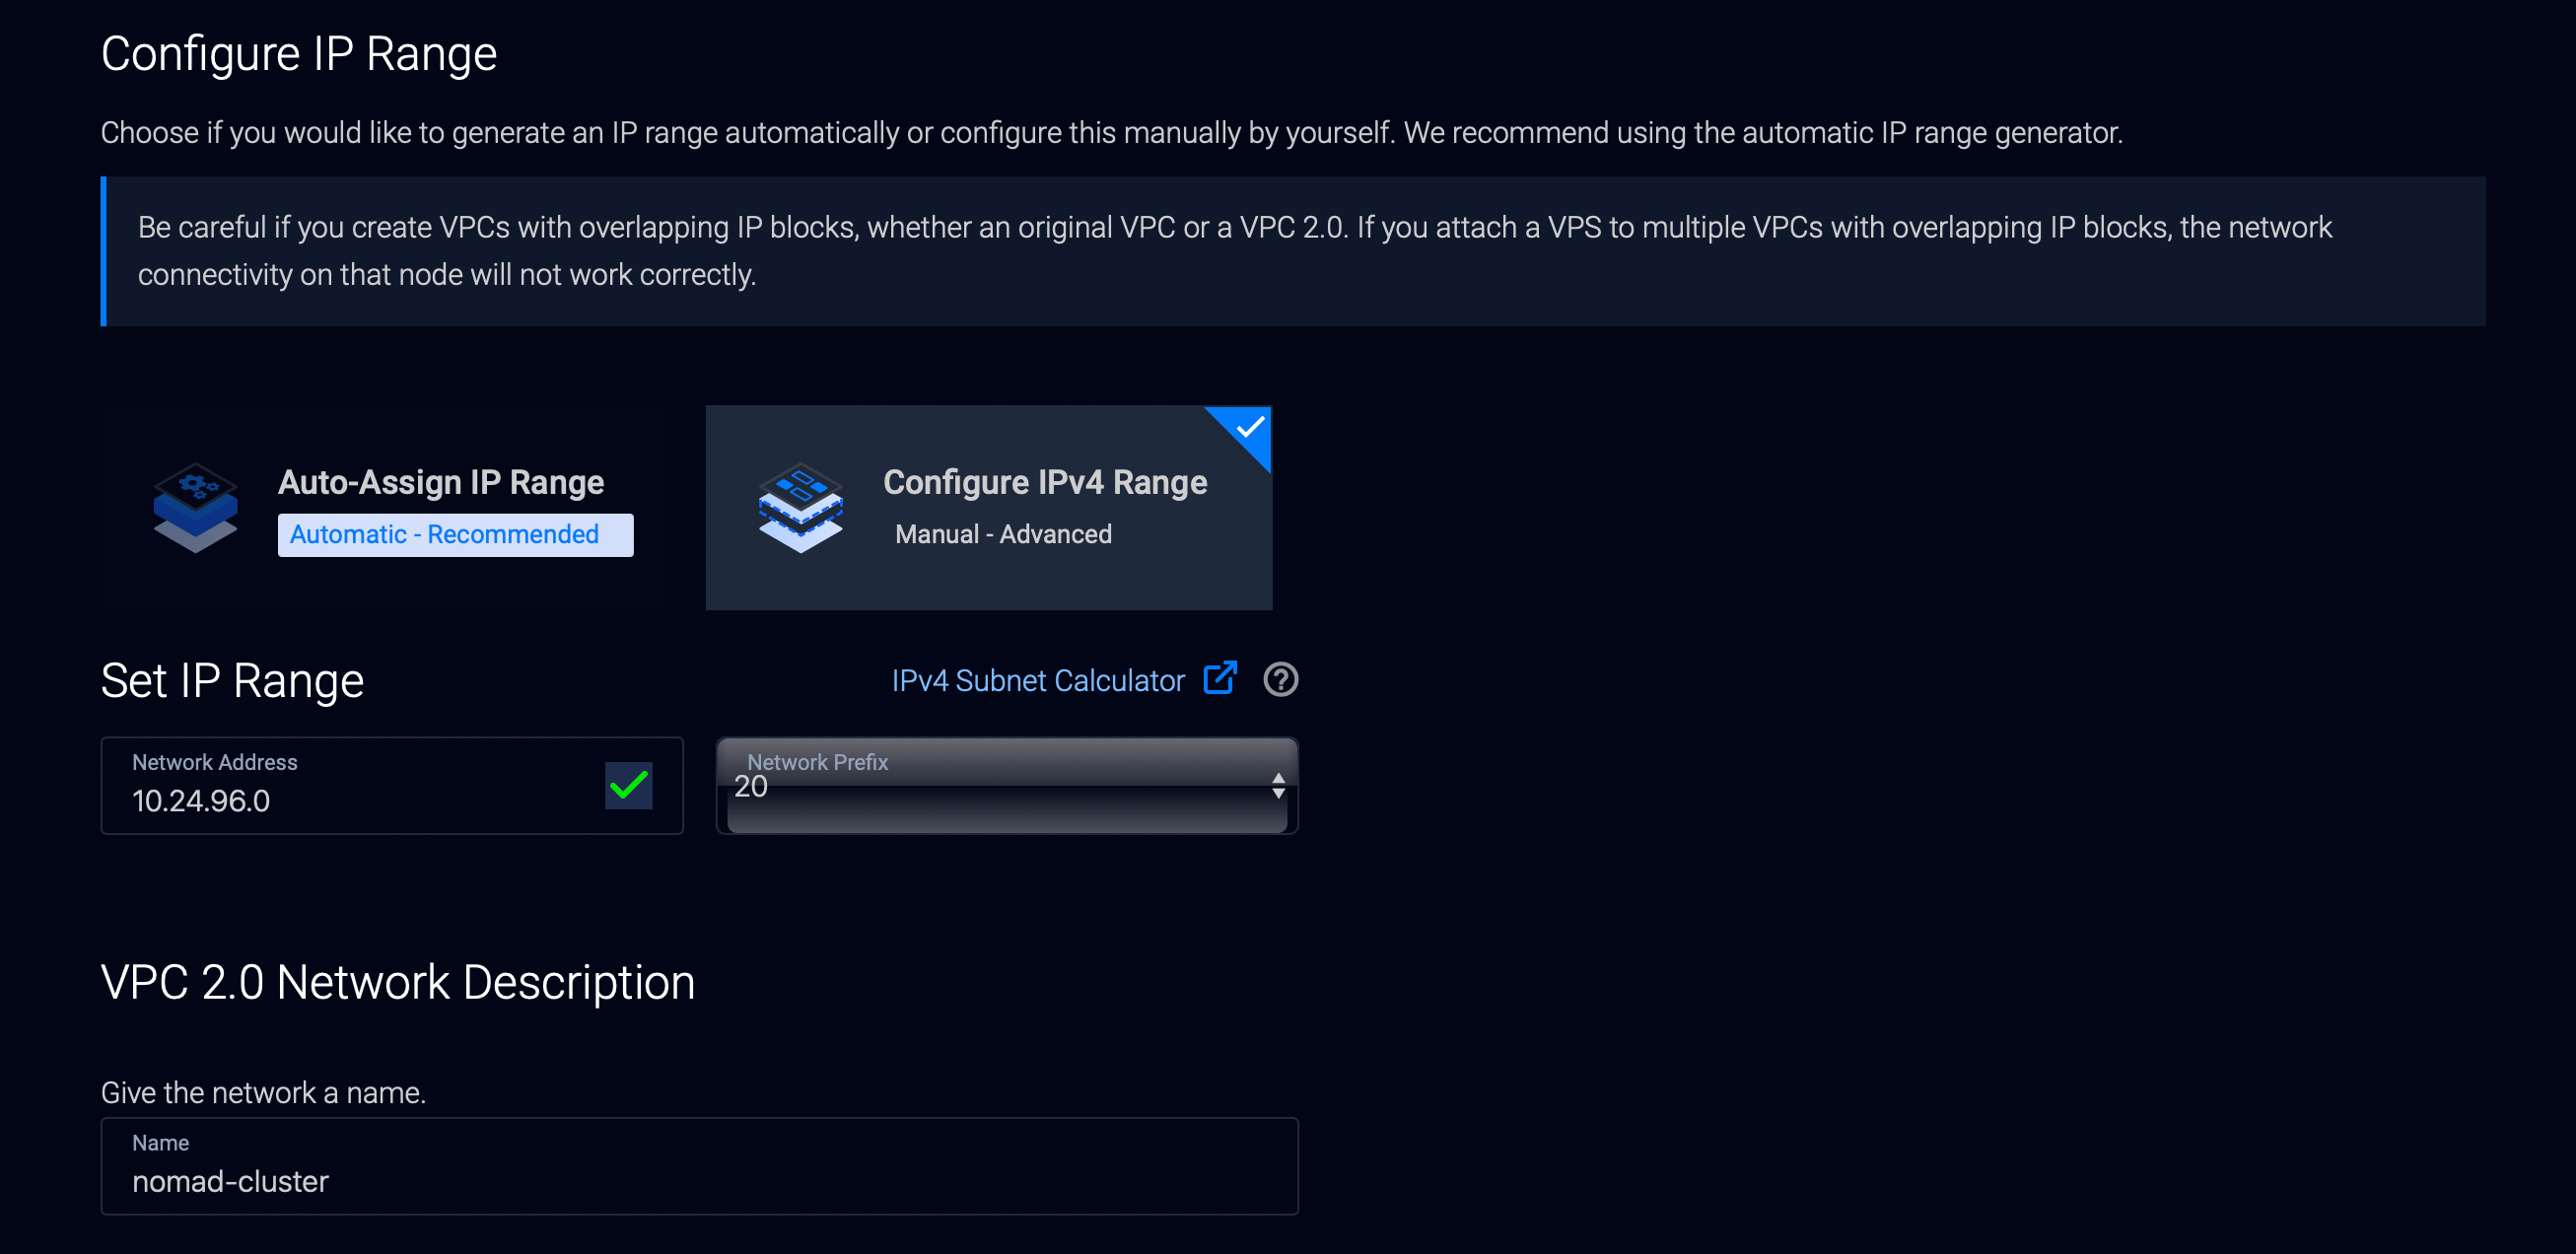
Then, scroll down, and hit “Configure IPv4 Range” and enter 10.24.96.0/20 (10.24.96.0 is the network address and 20 the network prefix).
We’re forcing the VPC address range, as our Boot Script will use this hardcoded IP range. If you opt to use an auto-assigned range, you will later need to edit the Boot Script with the IP range that was assigned to your account.
Finish by giving the network a name, eg. nomad-cluster. It can also be any value you’d like.
1.2. Create a Firewall
Next, we need to write firewall rules so that access to our server TCP/UDP ports is restricted to certain users only. This is especially important, as we won’t be enabling ACLs in this Nomad setup, therefore there won’t be any sort of authentication guarding our cluster public HTTP API and Web UI against other users. In a real production setup, you’d enable ACLs (more on that at the end of the article). Let’s create our firewall!
In the Vultr dashboard top bar, hover the blue Deploy button, then click “Add Firewall Group” and create a firewall group named eg. nomad-cluster (again, this can be any name you’d like).
Then, in the firewall, make sure to proceed as such for both:
- IPv4 Rules
- IPv6 Rules
With the following rules:
- Accept: ICMP from Anywhere
- Accept: SSH port 22 from My IP
- Accept: TCP port 4646 from My IP
- Accept: TCP port range 8000-8999 from Anywhere
- Drop: Any from Anywhere
Some explanations on certain ports:
- TCP 4646 is used for the Nomad HTTP API, it is especially important that access is restricted to your IP for now, as we won’t be enabling authentication. Failing to restrict this port will let any public Internet users deploy apps to your cluster, and do more things;
- TCP 8000 to 8999 will be used for your test apps, we want to share them with the world, so we will be accepting connections from anyone to those ports;
1.3. Create a Boot Script
Last step is to create a Boot Script, that will be ran exactly once every time a server gets created on Vultr. This script will setup and configure Nomad on the created server. Extra benefit of this script: whenever Vultr tells you that the server was activated, you won’t even have to SSH to the machine, Nomad will be 100% ready to go. Let’s create your Boot Script now.
In the Vultr dashboard top bar, hover the blue Deploy button, then click “View More Options”, then “Add Startup Script”.
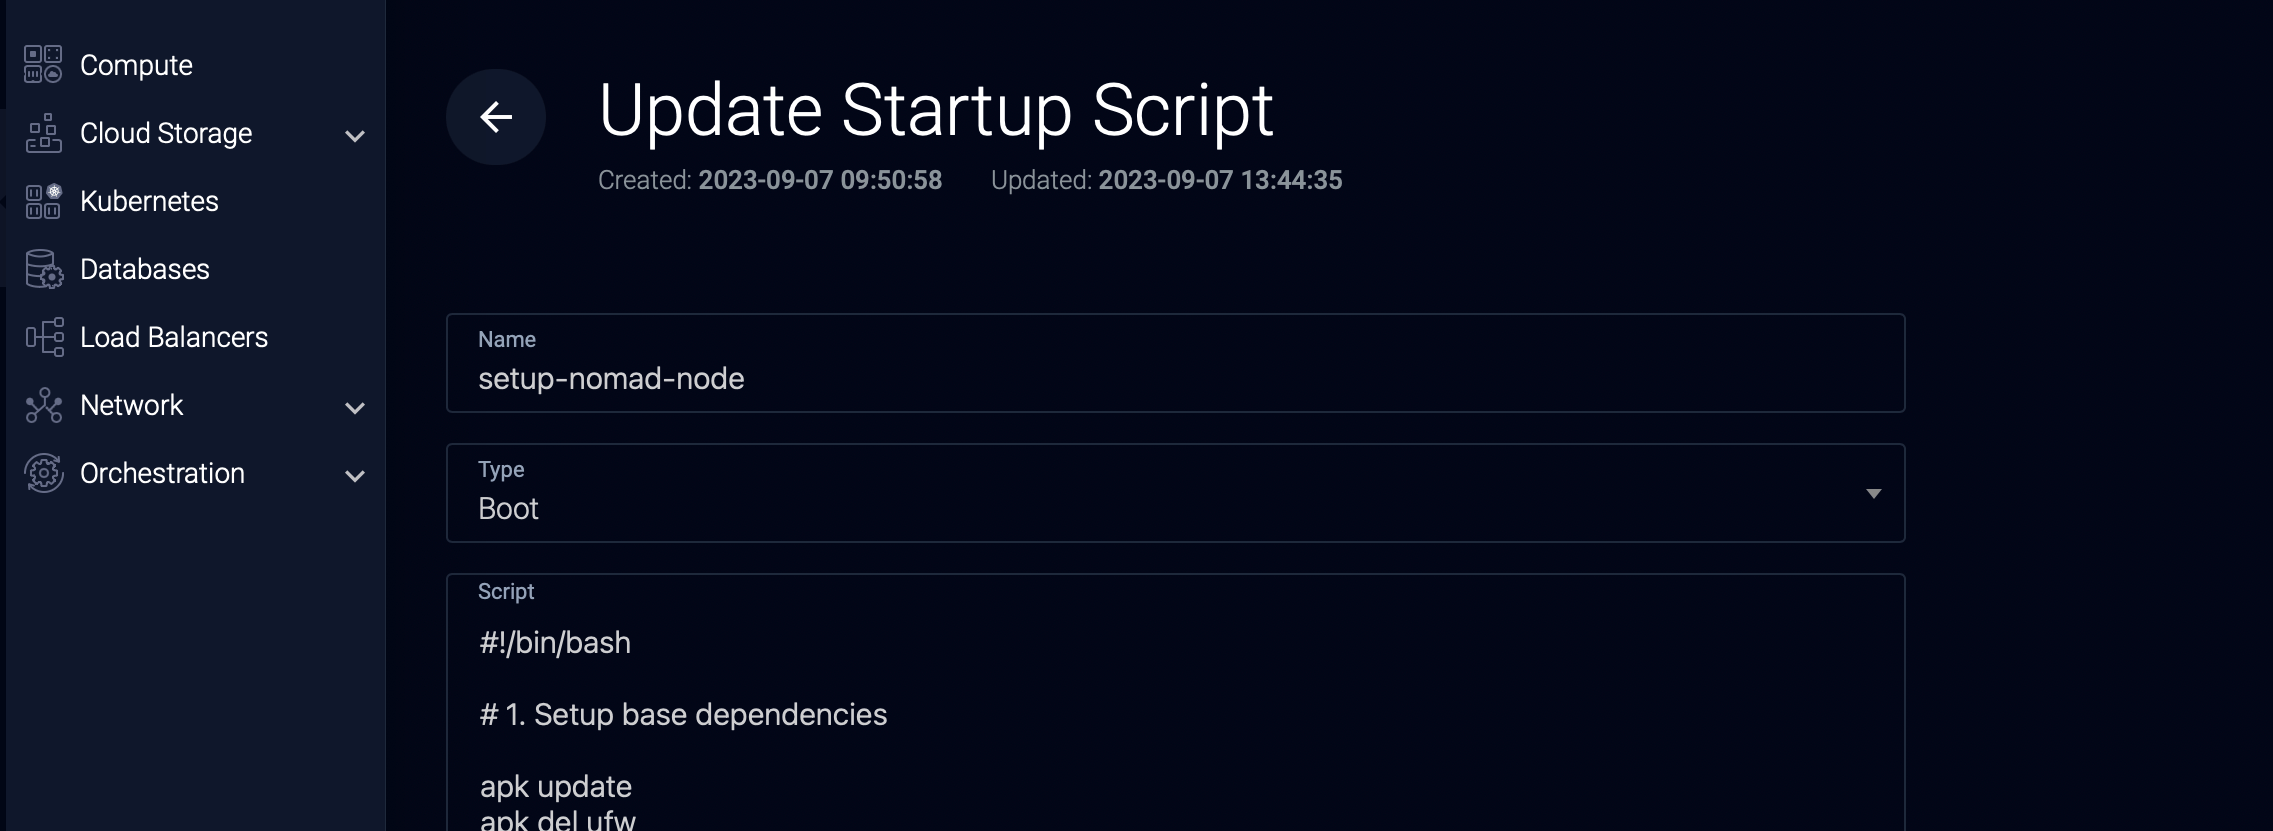
Call your script setup-nomad-node, mark is as Boot type, and enter the following script (or use this Gist):
#!/bin/bash

# 1. Setup base dependencies

apk update
apk del ufw
apk add htop busybox-extras

# 2. Disable Swap

swapoff -a
sed -i "/swapfile/d" /etc/fstab
rm /swapfile

# 3. Install Nomad + Docker + Consul

apk add nomad
rc-update add nomad default

apk add consul
rc-update add consul default

if [[ $(hostname) = nomad-cluster-client-* ]]; then
  apk add docker
  rc-update add docker default
fi

# 4. Export environment variables

export NOMAD_CLUSTER_REGION="global"
export NOMAD_CLUSTER_DATACENTER="vultr-par"

export NOMAD_CLUSTER_NODE_SELF="{{ GetInterfaceIP \\\"eth1\\\" }}"
export NOMAD_CLUSTER_SERVER_1="10.24.96.3"
export NOMAD_CLUSTER_SERVER_2="10.24.96.4"
export NOMAD_CLUSTER_SERVER_3="10.24.96.5"

export CONSUL_CLUSTER_DATACENTER=${NOMAD_CLUSTER_DATACENTER}

export CONSUL_CLUSTER_NODE_SELF=${NOMAD_CLUSTER_NODE_SELF}
export CONSUL_CLUSTER_SERVER_1=${NOMAD_CLUSTER_SERVER_1}
export CONSUL_CLUSTER_SERVER_2=${NOMAD_CLUSTER_SERVER_2}
export CONSUL_CLUSTER_SERVER_3=${NOMAD_CLUSTER_SERVER_3}

export CONSUL_CLUSTER_CLIENT_LOCAL="127.0.0.1"

# 5. Configure Consul

rm /etc/consul/*
touch /etc/consul/server.hcl
chmod 640 /etc/consul/server.hcl
chown consul:consul -R /etc/consul/

if [[ $(hostname) = nomad-cluster-server-* ]]; then
  cat << EOF > /etc/consul/server.hcl
datacenter           = "${CONSUL_CLUSTER_DATACENTER}"

data_dir             = "/var/consul"

disable_update_check = true
enable_syslog        = false

bind_addr            = "${CONSUL_CLUSTER_NODE_SELF}"
advertise_addr       = "${CONSUL_CLUSTER_NODE_SELF}"
client_addr          = "${CONSUL_CLUSTER_CLIENT_LOCAL}"

server               = true
bootstrap_expect     = 3

retry_join = [
  "${CONSUL_CLUSTER_SERVER_1}",
  "${CONSUL_CLUSTER_SERVER_2}",
  "${CONSUL_CLUSTER_SERVER_3}"
]

ui_config {
  enabled = false
}
EOF
else
  cat << EOF > /etc/consul/server.hcl
datacenter           = "${CONSUL_CLUSTER_DATACENTER}"

data_dir             = "/var/consul"

disable_update_check = true
enable_syslog        = false

bind_addr            = "${CONSUL_CLUSTER_NODE_SELF}"
advertise_addr       = "${CONSUL_CLUSTER_NODE_SELF}"
client_addr          = "${CONSUL_CLUSTER_CLIENT_LOCAL}"

retry_join = [
  "${CONSUL_CLUSTER_SERVER_1}",
  "${CONSUL_CLUSTER_SERVER_2}",
  "${CONSUL_CLUSTER_SERVER_3}"
]
EOF
fi

# 6. Configure Nomad

if [[ $(hostname) = nomad-cluster-server-* ]]; then
  cat << EOF > /etc/nomad.d/server.hcl
region               = "${NOMAD_CLUSTER_REGION}"
datacenter           = "${NOMAD_CLUSTER_DATACENTER}"

data_dir             = "/var/lib/nomad"
plugin_dir           = "/usr/lib/nomad/plugins"

disable_update_check = true
enable_syslog        = false

addresses {
  http = "0.0.0.0"
  rpc  = "${NOMAD_CLUSTER_NODE_SELF}"
  serf = "${NOMAD_CLUSTER_NODE_SELF}"
}

advertise {
  http = "${NOMAD_CLUSTER_NODE_SELF}"
  rpc  = "${NOMAD_CLUSTER_NODE_SELF}"
  serf = "${NOMAD_CLUSTER_NODE_SELF}"
}

server {
  enabled          = true
  bootstrap_expect = 3

  server_join {
    retry_join = [
      "${NOMAD_CLUSTER_SERVER_1}",
      "${NOMAD_CLUSTER_SERVER_2}",
      "${NOMAD_CLUSTER_SERVER_3}"
    ]
    retry_max      = 0
    retry_interval = "5s"
  }
}

consul {
  address = "${CONSUL_CLUSTER_CLIENT_LOCAL}:8500"
}

ui {
  enabled = true
}
EOF
else
  cat << EOF > /etc/nomad.d/server.hcl
region               = "${NOMAD_CLUSTER_REGION}"
datacenter           = "${NOMAD_CLUSTER_DATACENTER}"

data_dir             = "/var/lib/nomad"
plugin_dir           = "/usr/lib/nomad/plugins"

disable_update_check = true
enable_syslog        = false

addresses {
  http = "0.0.0.0"
  rpc  = "${NOMAD_CLUSTER_NODE_SELF}"
  serf = "${NOMAD_CLUSTER_NODE_SELF}"
}

advertise {
  http = "${NOMAD_CLUSTER_NODE_SELF}"
  rpc  = "${NOMAD_CLUSTER_NODE_SELF}"
  serf = "${NOMAD_CLUSTER_NODE_SELF}"
}

server {
  enabled = false
}

client {
  enabled = true

  servers = [
    "${NOMAD_CLUSTER_SERVER_1}",
    "${NOMAD_CLUSTER_SERVER_2}",
    "${NOMAD_CLUSTER_SERVER_3}"
  ]

  options = {
    "driver.allowlist" = "docker"
  }
}

consul {
  address = "${CONSUL_CLUSTER_CLIENT_LOCAL}:8500"
}

plugin "docker" {
  config {
    volumes {
      enabled = true
    }
  }
}
EOF
fi

# 7. Reboot

reboot now
👉 If your VPC IP range is different from 10.24.96.0/20, you should perform a search & replace on 10.24.96. and replace it with your own VPC IP prefix.
2. Create Nomad Servers
It’s time to deploy your first Vultr servers, running Nomad server agents! We will be deploying 3x Nomad server agents, as this is the sweet spot between safety and cost-optimization in a distributed cluster. Indeed, if a leader Nomad server agent fails, then new elections will need to take place to elect a new leader. As you need majority in an election, a minimum of 3 participants are required.
Those Nomad server nodes will not host our apps directly, therefore we will be creating cheap tiny Vultr servers.
2.1. Create the Nomad servers
In the Vultr dashboard top bar, hover the blue Deploy button, then click “Deploy New Server”.
Follow those steps then:
- Pick “Cloud Compute”;
- Pick “Intel Regular Performance”;
- Select your datacenter region (which must be the same than the location you have created your VPC in), eg. mine is Paris;
- Select the “Alpine Linux” server image;
- Pick the smallest server size, which should be $5/mth;
- In “Additional Features”, tick “Enable IPv6” and “Enable VPC” 2.0, leave the rest unticked;
- Select the VPC that you previously created;
- Select your Boot Script in Startup Script;
- Pick your SSH keys, or add a new one;
- Select your Firewall Group in the dropdown;
- Adjust “Server Quantity” so that you create a total of 3 servers;
- Finally, name each of your server as such, in chronological order:
nomad-cluster-server-1nomad-cluster-server-2nomad-cluster-server-3
⚠️ The name of your servers is important, as the Boot Script will use the server name to either bootstrap a Nomad server agent, or a Nomad client agent.
When this is all done, hit “Deploy Now” and wait for all of your servers to come online.
2.2. Confirm that the Nomad cluster is healthy
When servers are ready, SSH to any one of them, and run the following command:
nomad server members
The command should output the list of your 3 Nomad server agents running in the cluster, with one of them marked as leader. If this works, then it means that your cluster is healthy!
You may also already access your cluster Web UI from your Web browser, by entering the IP of any server in the 3 that you created, followed by port 4646.
3. Create Nomad Clients
Before we can deploy our first app, we need to deploy at least one Nomad client agent, which will run our apps on Docker.
Doing so is as simple as repeating the steps we followed to create our Nomad servers, but this time we will be creating larger, beefier, servers:
- “Cloud Compute”;
- “Intel High Performance”;
- Eg. 2vCPU and 2GB RAM, or more;
You may disable “Auto Backups” on those ones to save some costs, as those client servers can be considered disposable, because they do not hold any state or sensitive data.
You may create 1 or more client servers, I heavily recommend at least 2 so that you have failover capabilities on your apps in the event that one client server crashes.
Finally, name each of your client servers as such, in chronological order:
nomad-cluster-client-1nomad-cluster-client-2- (…)
⚠️ The name of your servers is also important there, as the Boot Script will use them to create a Nomad client agent there.
When this is all done, hit “Deploy Now” and wait for all of your client servers to come online.
4. Deploy your First App
It is now time to deploy our first app on our Nomad cluster.
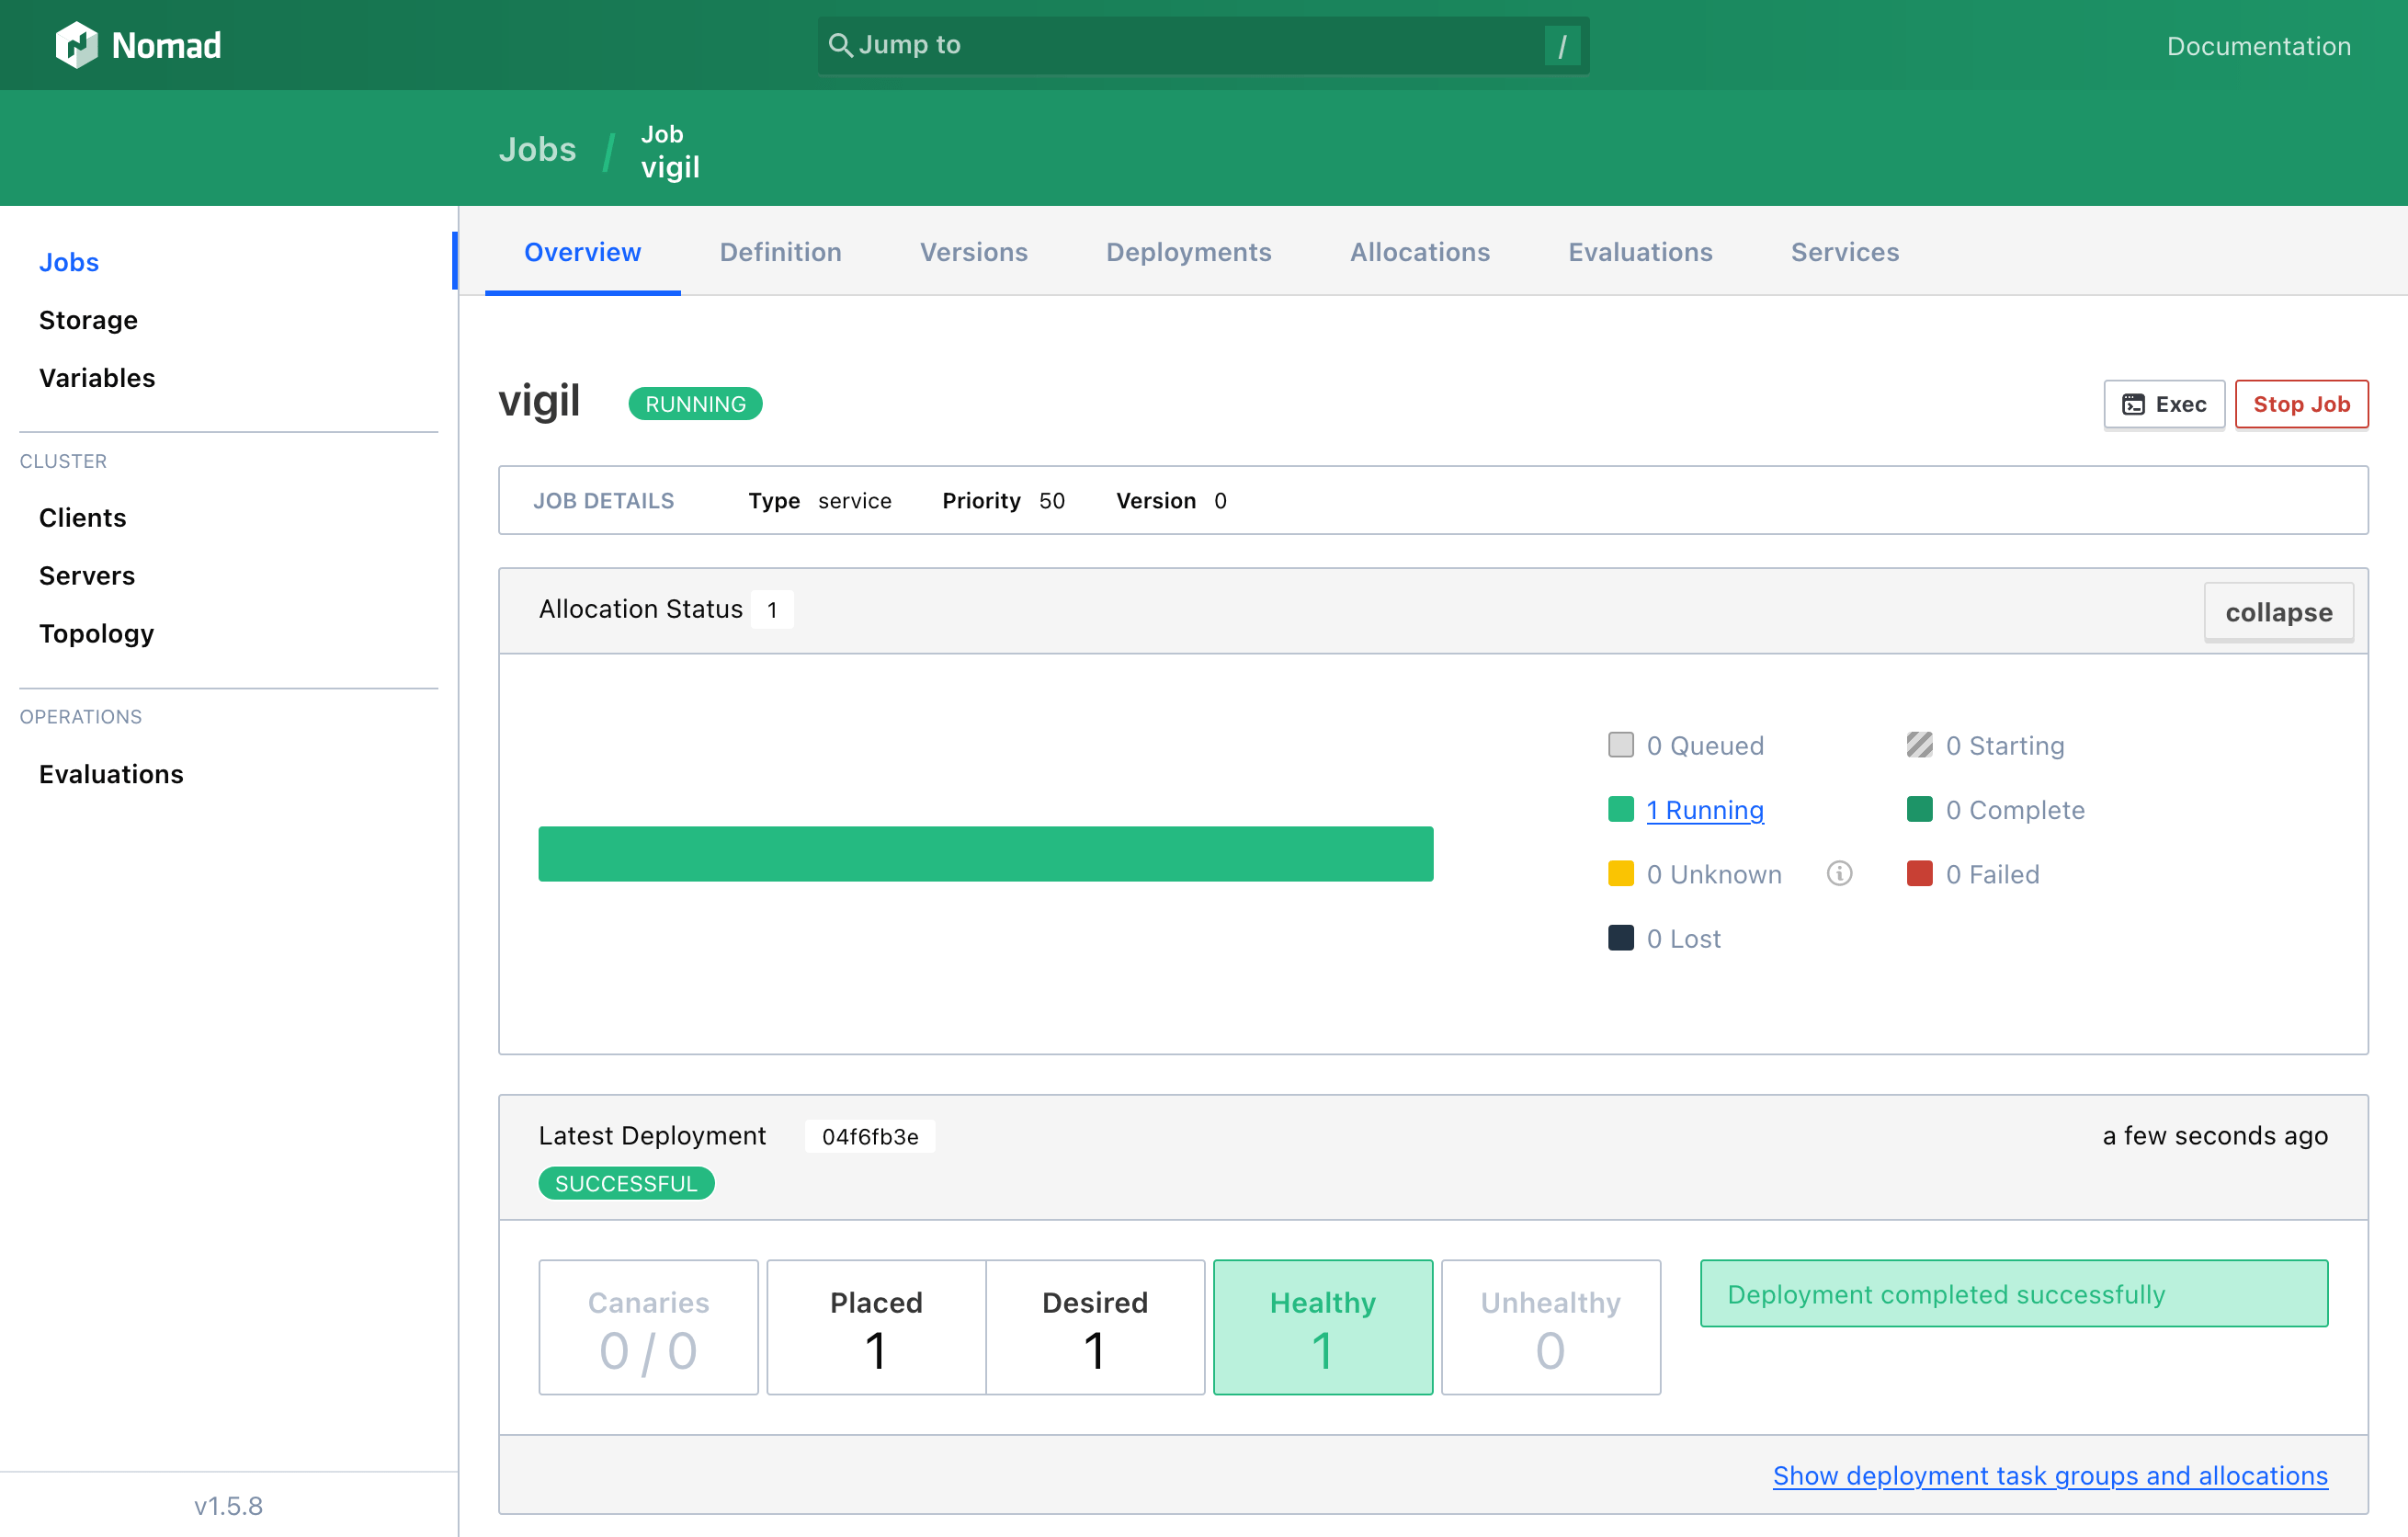
4.1. Deploying Vigil
The first step is to install the Nomad CLI on your local machine. If you are using macOS and Homebrew, it is as easy as running: brew install nomad
Now, we need to write a Nomad definition file that specifies how Nomad should run Vigil, we named this file vigil.hcl:
job "vigil" {
  region = "global"
  datacenters = ["vultr-par"]
  type = "service"

  group "vigil" {
    count = 1

    network {
      port "http" {
        static = 8003
      }
    }

    task "vigil" {
      driver = "docker"

      config {
        image = "valeriansaliou/vigil"
        ports = ["http"]

        volumes = [
          "local/vigil.cfg:/etc/vigil.cfg"
        ]
      }

      env {
        SERVER_LOG_LEVEL      = "info"
        SERVER_INET           = "0.0.0.0:8003"
        SERVER_MANAGER_TOKEN  = "0394e257-0a33-4209-b26a-9d1eb73ad320"
        SERVER_REPORTER_TOKEN = "f005fa9f-7a6e-4e16-bfc7-9398575b62c2"
      }

      resources {
        cpu    = 100
        memory = 10
      }

      template {
        destination = "local/vigil.cfg"
        data        = file("vigil.cfg")
      }

      service {
        name = "vigil-http"
        port = "http"

        check {
          type     = "http"
          path     = "/"
          interval = "5s"
          timeout  = "2s"
        }
      }
    }
  }
}
Next, in the same folder, create Vigil’s configuration file named vigil.cfg:
[server]

log_level = "${SERVER_LOG_LEVEL}"
inet = "${SERVER_INET}"

manager_token = "${SERVER_MANAGER_TOKEN}"
reporter_token = "${SERVER_REPORTER_TOKEN}"

[assets]

path = "./res/assets/"

[branding]

page_title = "Crisp Status"
page_url = "https://status.crisp.chat/"
company_name = "Crisp IM SAS"
icon_color = "#1972F5"
icon_url = "https://valeriansaliou.github.io/vigil/images/crisp-icon.png"
logo_color = "#1972F5"
logo_url = "https://valeriansaliou.github.io/vigil/images/crisp-logo.svg"
website_url = "https://crisp.chat/"
support_url = "mailto:support@crisp.chat"
custom_html = ""

[metrics]

[notify]

reminder_interval = 300

[probe]

[[probe.service]]

id = "web"
label = "Web nodes"

[[probe.service.node]]

id = "status"
label = "Access to status page"
mode = "poll"
replicas = ["https://status.crisp.chat/robots.txt"]
http_body_healthy_match = "User-agent:.*"
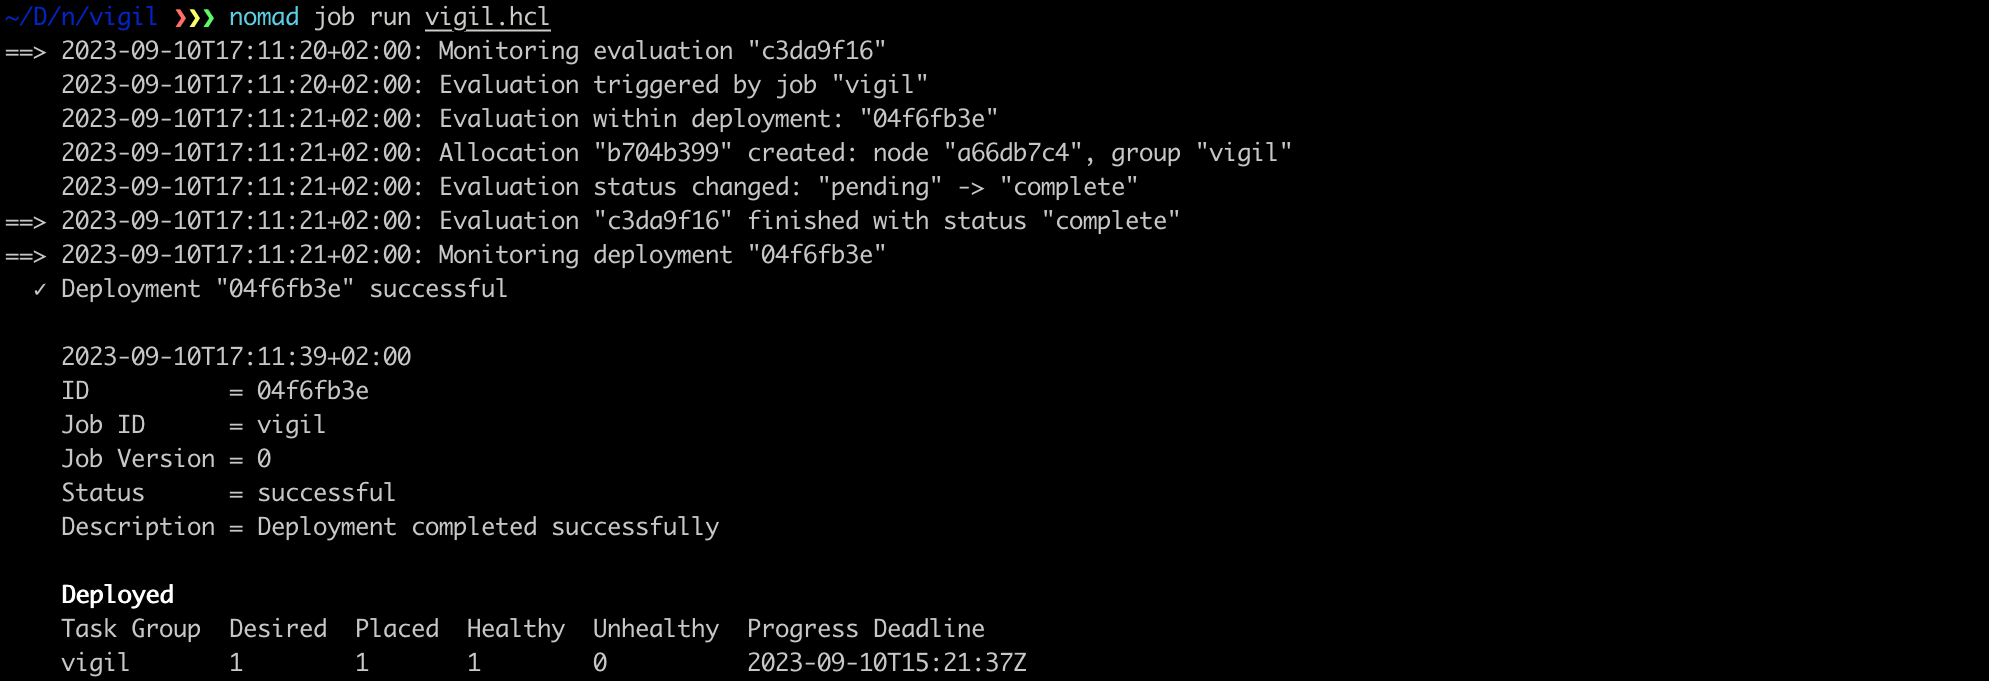
Finally, submit the job to your Nomad cluster (make sure to insert the IP address of either one of your 3 Nomad servers):
export NOMAD_ADDR=http://[IP_ADDRESS_OF_NOMAD_SERVER]:4646
nomad job run vigil.hcl
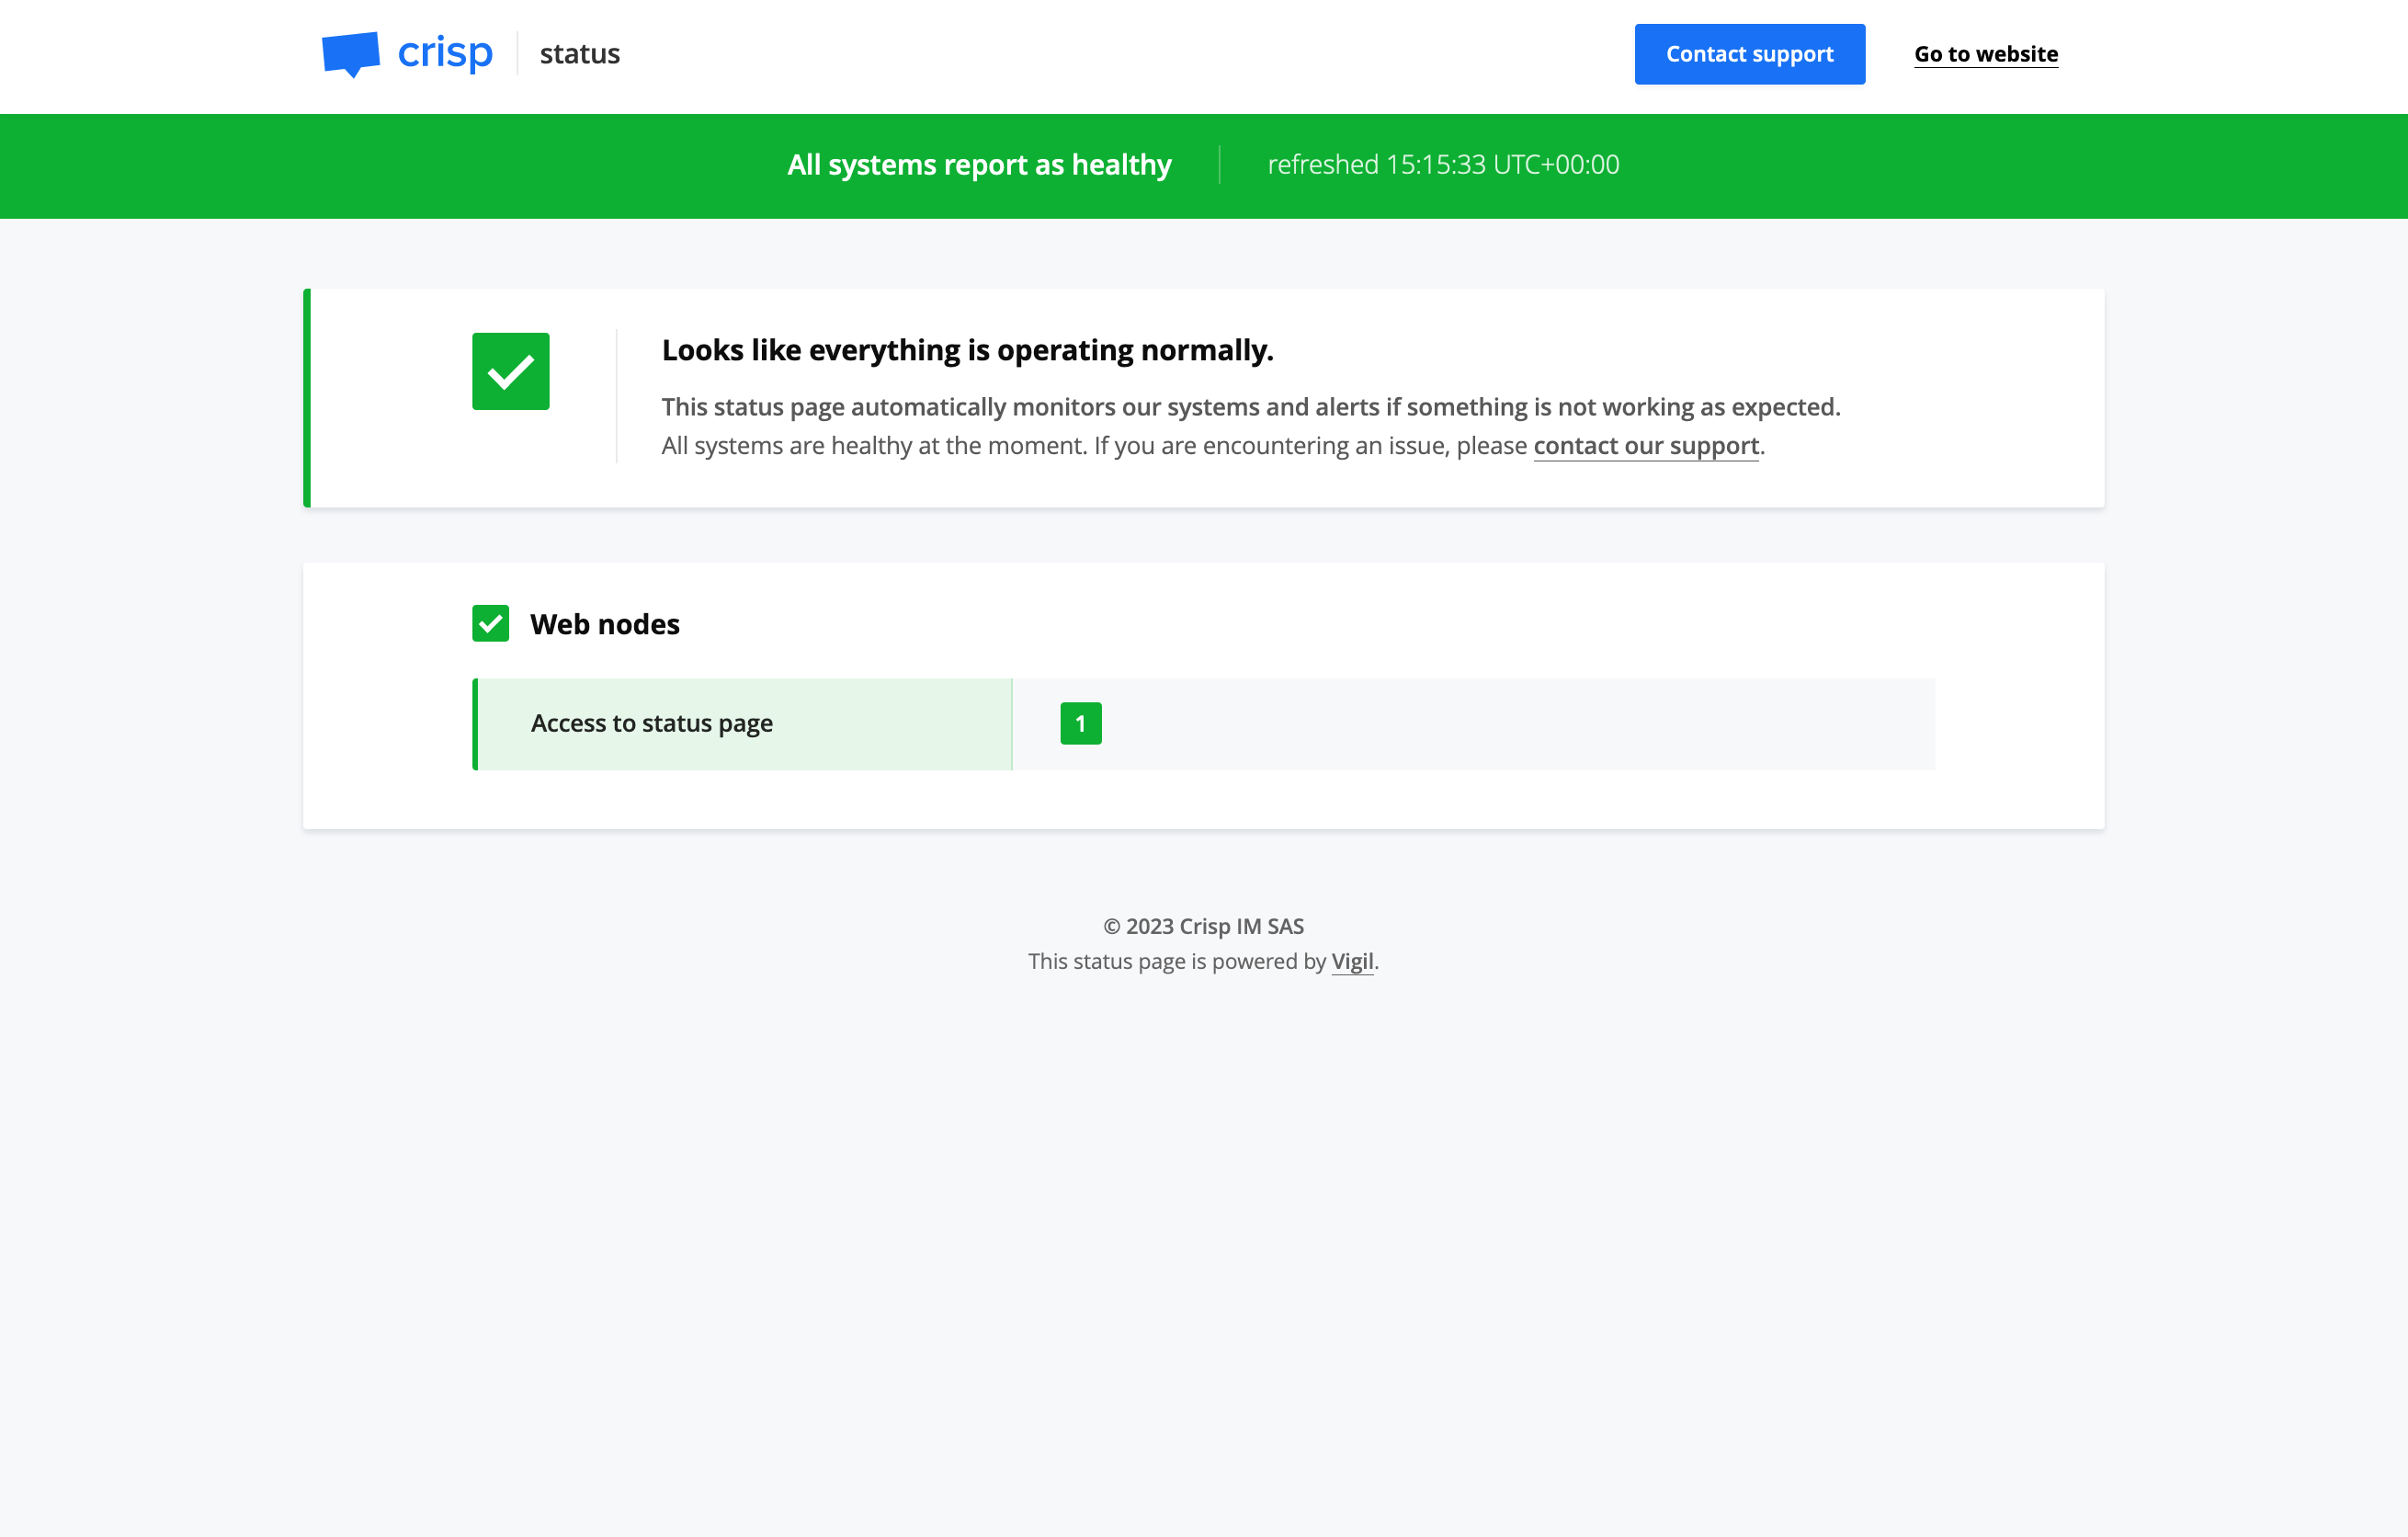
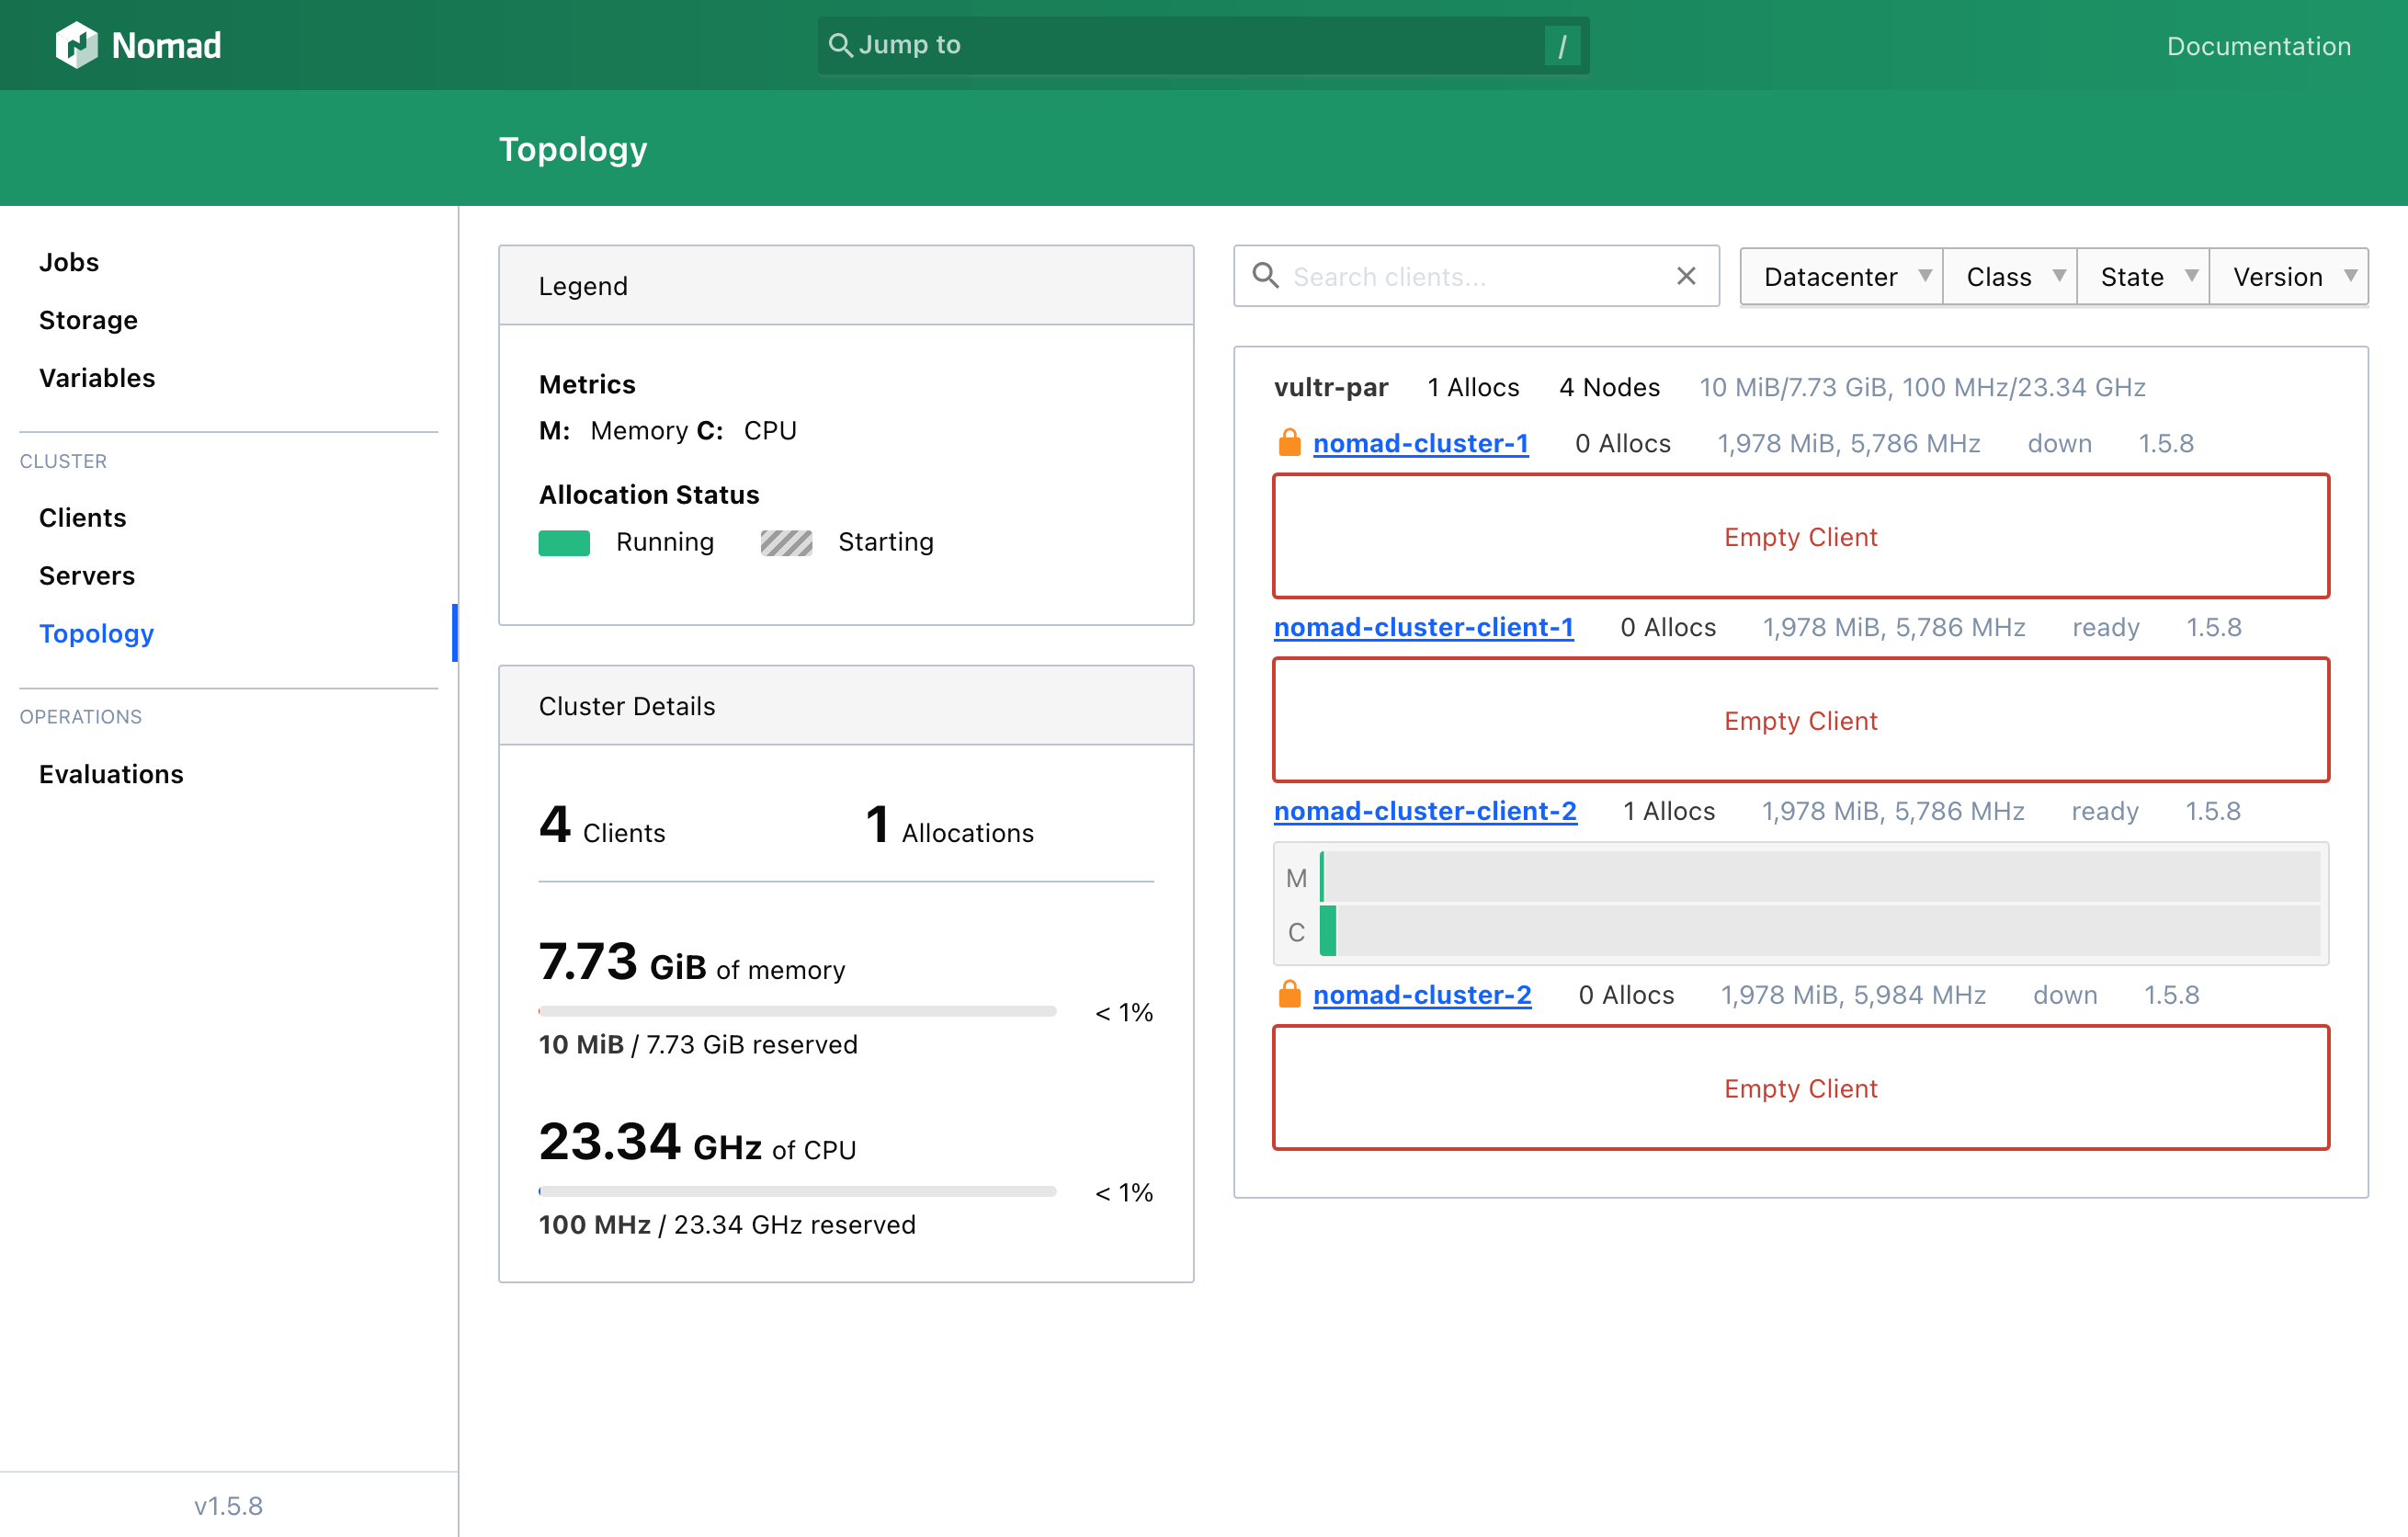
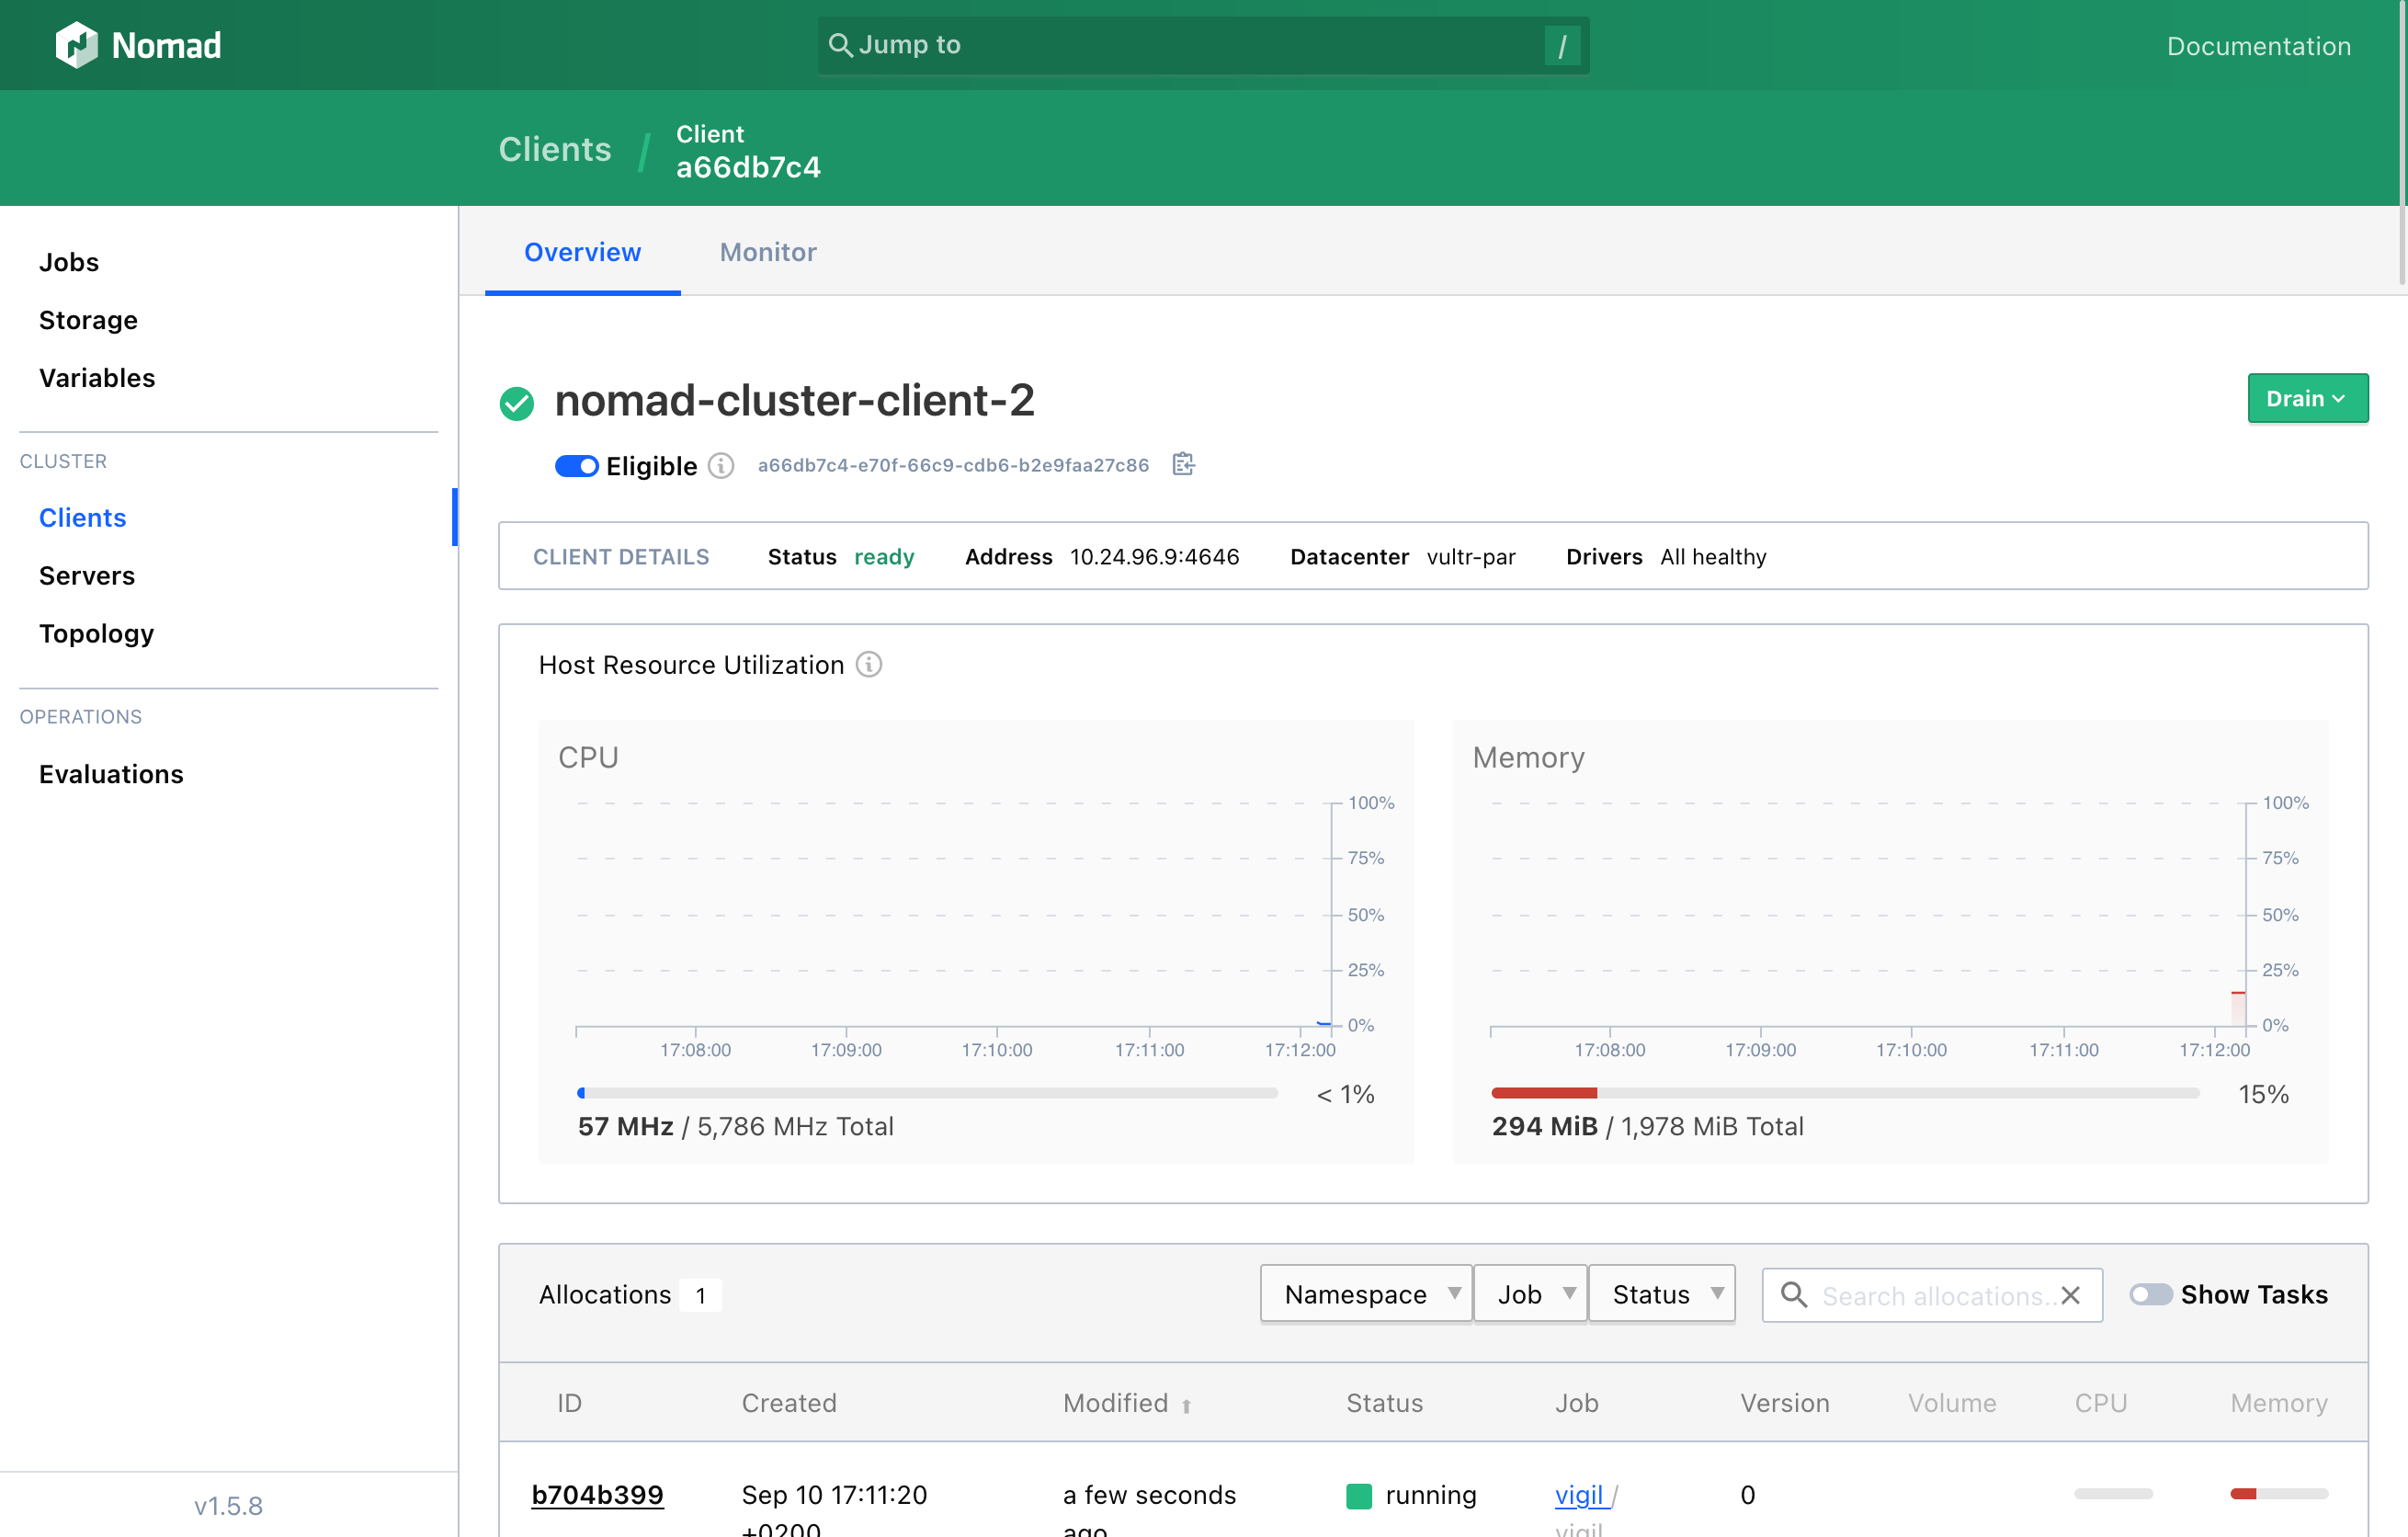
4.2. Exploring Nomad’s Web UI
5. Important Security Considerations
The nomad cluster that we deployed herein is by no means secure. For simplicity’s sake, I haven’t covered here the topics of ACLs, mTLS, and symmetric encryption of the gossip protocol between servers. You may read HashiCorp’s documentation about Nomad’s security model.
If you would like to make your Nomad cluster production-ready, you should explore those topics and apply the necessary configuration changes:
- Enable gossip encryption;
- Deploy ACLs;
- Setup mTLS (mutual TLS);
Please share what kind of workloads you are running in the comments below! I’d love to hear about your experience setting up Nomad, running apps, as well as any question you’d have.
On my side, Nomad will come handy at helping me simplify and automate the complex 100+ servers setup that runs Crisp, removing the need for frequent human intervention. Automation is key to building a profitable business!
🇫🇷 Written from Lyon, France.